Ableton Live Tutorial: Step-by-Step Guide For
Beginners
Every track that moves a dance floor started with someone opening a DAW for the first time. If you're here looking for an Ableton Live tutorial, you're already making the right call, Ableton is the production software behind a massive chunk of the EDM you hear at festivals, clubs, and on your favorite playlists. At RIKIO ROCKS, we cover the electronic music scene from every angle, and learning how to produce is where many of the artists we feature got their start.
The problem most beginners run into isn't a lack of ambition, it's the overwhelm of staring at an unfamiliar interface with no clear direction. Ableton Live is powerful, but that power means nothing if you don't know where to click first. You need a structured path, not a random collection of tips.
That's exactly what this guide delivers. We'll walk you through Ableton Live from installation to your first finished track, covering the interface, instruments, audio recording, effects, and arrangement. Whether you want to produce house, dubstep, drum & bass, or any other genre, these fundamentals apply across the board. Let's get into it.
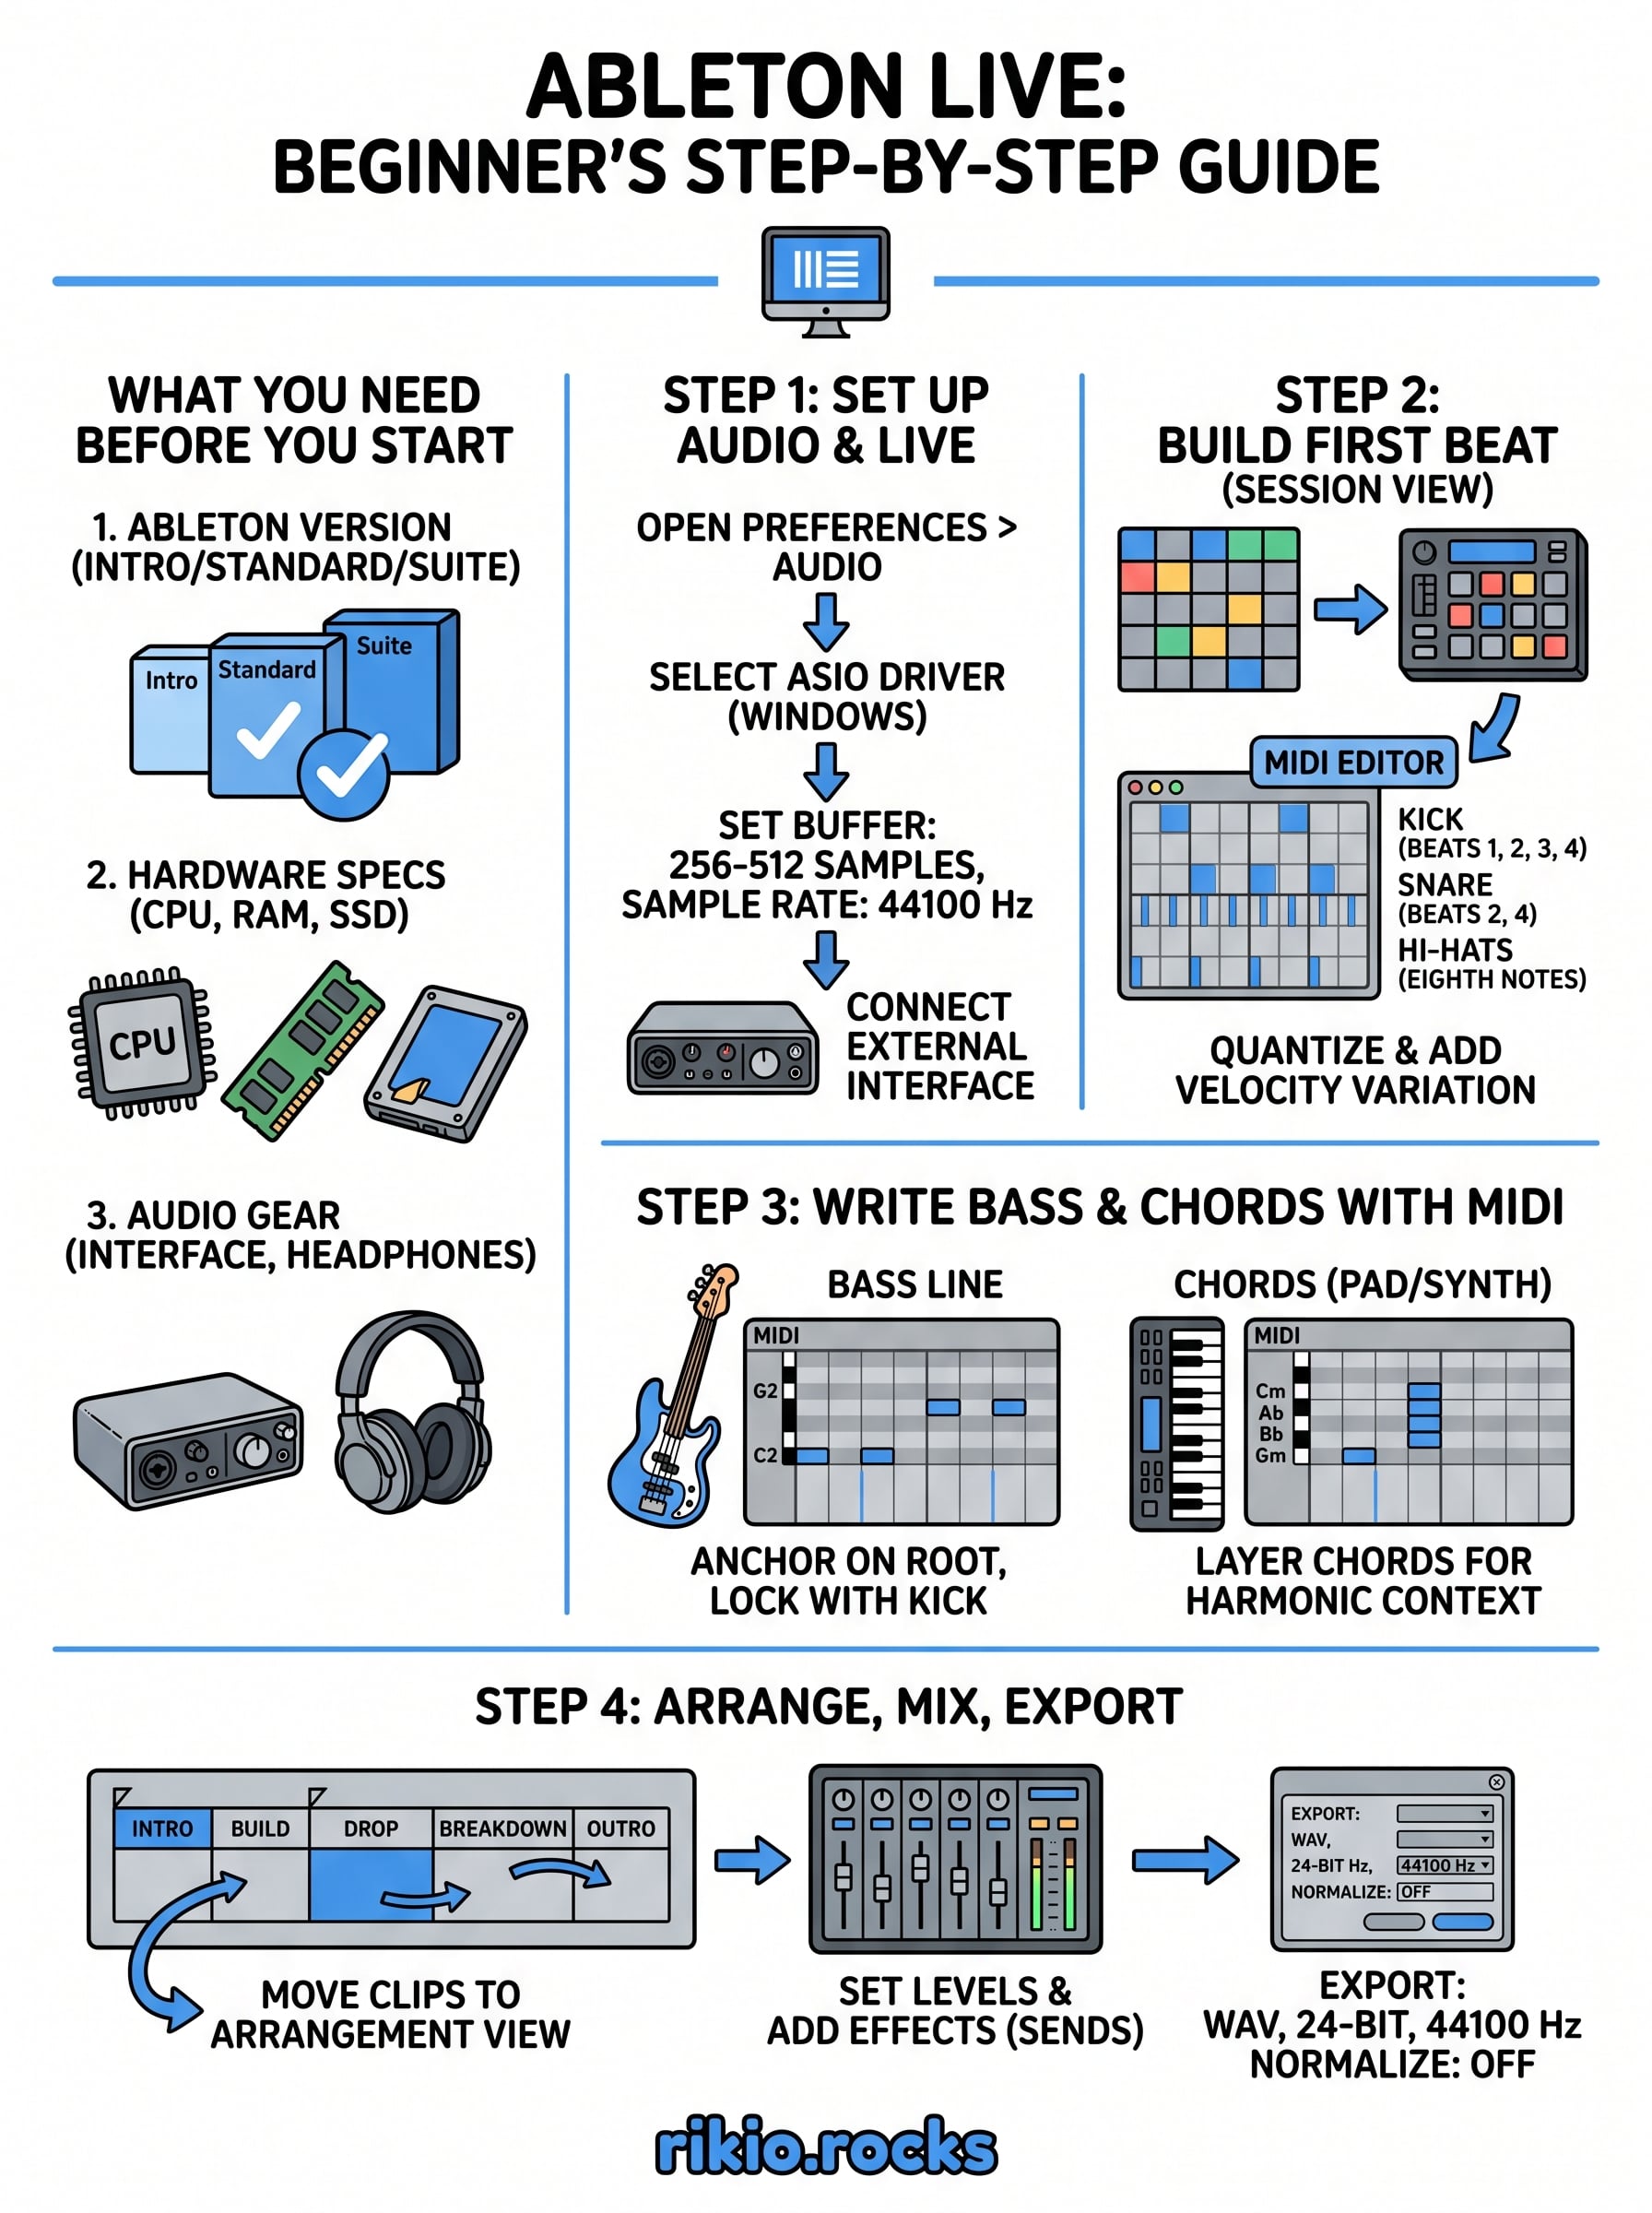
What you need before you start
Before you follow a single step in this Ableton Live tutorial, you need the right setup in place. Jumping into production without the proper tools costs you time and creates frustration that has nothing to do with your actual skills. Getting this foundation right means every concept you learn will translate into real results at your workstation.
The right version of Ableton Live
Ableton comes in three tiers: Intro, Standard, and Suite. For beginners, Intro covers the core workflow but limits you to 16 tracks and a smaller device library. Standard removes those track limits and adds more instruments and effects. Suite gives you the complete collection of instruments, samples, and Max for Live, which is the deepest option for EDM production. Most newcomers start with Intro or Standard and upgrade once they outgrow what they have.
If you're serious about EDM production, start with Standard at minimum. The extra instruments and effects pay for themselves quickly once you understand how to use them.
Ableton offers a 30-day free trial of Suite, which is the smartest move before committing any money. The trial gives you full access to everything, so use it to follow along with this entire guide and decide which tier actually fits your workflow.
Hardware requirements
Your computer needs to handle real-time audio processing, which puts significantly more demand on your CPU and RAM than writing documents or browsing the web. Here are the specs you need to run Ableton Live without constant audio glitches or crashes:
|
Spec
|
Minimum
|
Recommended
|
|
OS
|
macOS 11, Windows 10
|
macOS 13+, Windows 11
|
|
CPU
|
Intel Core i5 / AMD Ryzen 5
|
Intel Core i7 / AMD Ryzen 7
|
|
RAM
|
8 GB
|
16 GB or more
|
|
Storage
|
3 GB free (18 GB for Suite)
|
SSD with 50+ GB free
|
|
Display
|
1024x768
|
1280x800 or higher
|
An SSD is not negotiable if you want smooth performance. Loading samples and instruments from a spinning hard drive creates audio dropouts and lag that interrupt your session at the worst moments. If your machine sits at the minimum end of these specs, keep your buffer size higher (512 or 1024 samples) and freeze CPU-heavy tracks as your project grows. That buys you headroom without needing new hardware immediately.
Audio gear that makes a real difference
Your laptop's built-in audio chip introduces latency, the gap between when you play a note and when you hear it back. That delay makes it nearly impossible to play instruments in time or judge your mixes accurately. An external audio interface solves this by using dedicated audio converters and ASIO drivers built specifically for low-latency recording. Entry-level options in the Focusrite Scarlett line are a reliable starting point that many producers continue using for years.
For monitoring, closed-back headphones are your best first option, particularly if your room has no acoustic treatment. Studio monitors reveal more detail in your mix, but an untreated room adds reflections that distort what you hear and leads to bad mixing decisions. A dependable pair of studio headphones will carry you through every step in this guide without misleading your ears.
A MIDI keyboard controller is optional, but it will change how fast you learn. Even a small 25-key USB controller makes playing melodies and triggering clips far more intuitive than clicking with a mouse. You don't need to spend much, a basic controller under $80 handles everything a beginner needs.
Step 1. Set up Live and your audio
Once you install Ableton Live and open it for the first time, the interface looks busy. Before you touch anything creative, you need to configure your audio settings properly. Getting this right eliminates the latency and crackling that can derail a session before it starts, and the whole process takes less than five minutes.
Open the audio preferences
Go to Live > Preferences > Audio on Mac, or Options > Preferences > Audio on Windows. The first thing you'll see is the Driver Type dropdown. If you're on Windows, switch this from MME/DirectX to ASIO immediately. MME and DirectX are general-purpose drivers built with high latency, while ASIO is designed specifically for audio production. Mac users running CoreAudio can stay on that driver since it handles low-latency audio well without any changes.
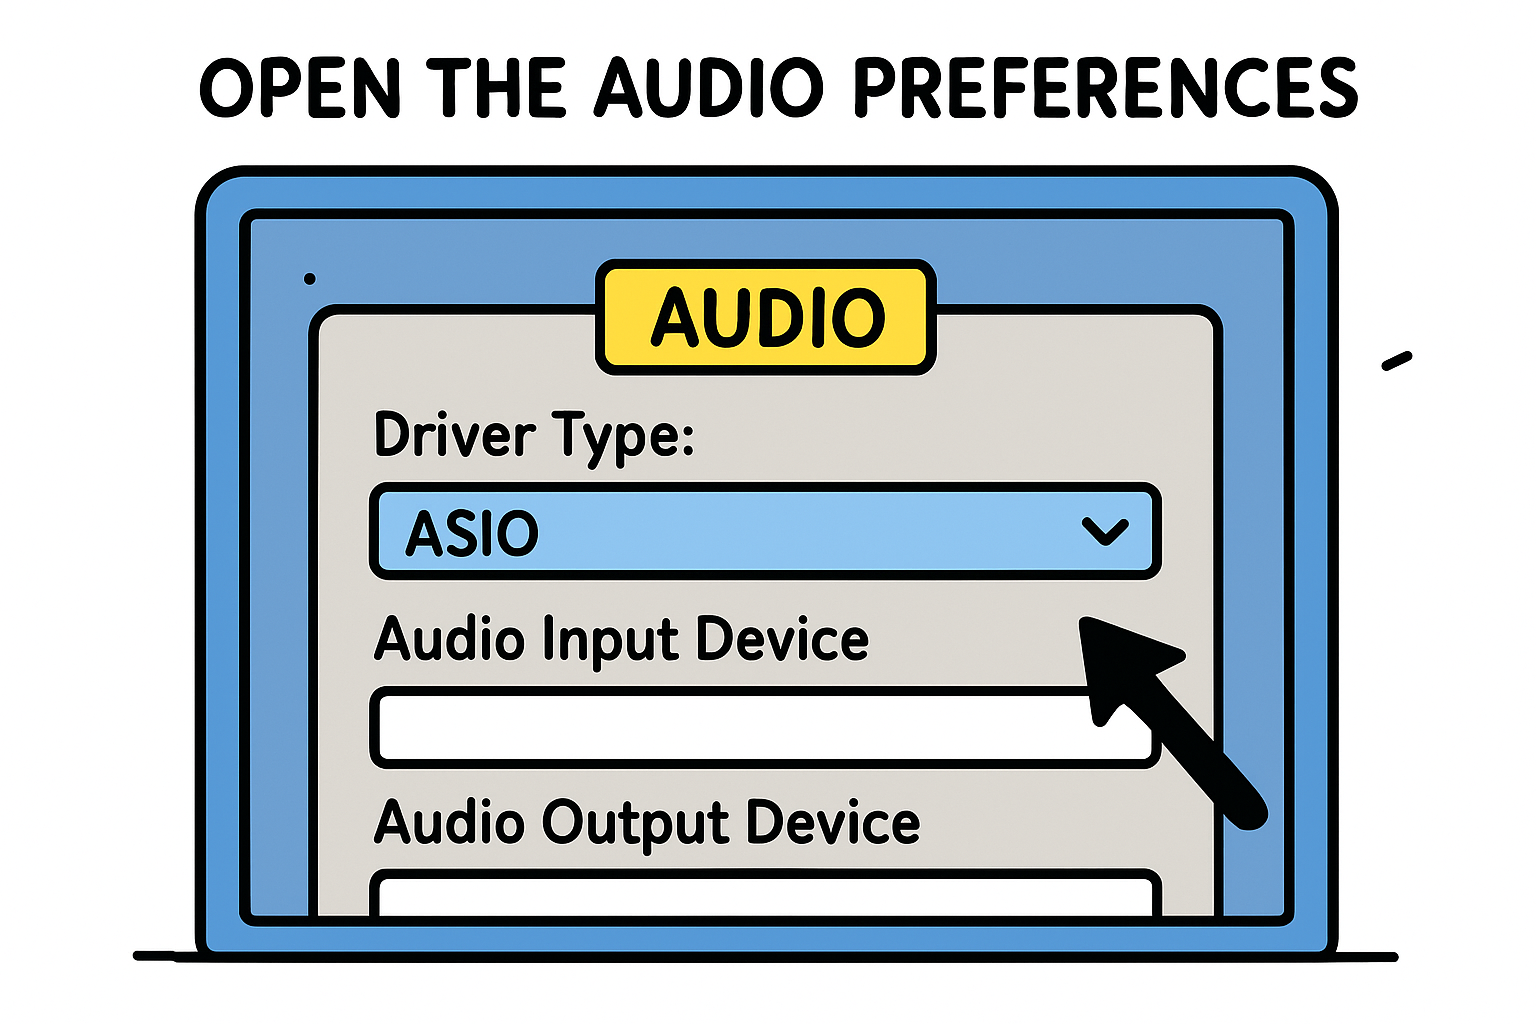
Skipping the ASIO switch on Windows is one of the most common beginner mistakes. MME latency can run above 100ms, which makes playing and recording in real time feel completely disconnected from what you hear.
After selecting your driver, set Audio Input Device and Audio Output Device to your external audio interface. If you're currently using headphones plugged directly into your laptop, select your built-in output and treat the higher latency as a temporary limitation until you add an interface.
Set your buffer size and sample rate
Your buffer size controls the trade-off between latency and CPU load. A lower buffer size means less delay between input and output, but it demands more from your processor. Start at 256 samples and test it by playing a clip back. If you hear crackling or dropouts, increase to 512. Most beginner setups run cleanly at either value.
For this Ableton Live tutorial, set your sample rate to 44100 Hz. That's the standard for streaming and digital audio releases. 48000 Hz works for film and high-resolution projects, but 44100 Hz is the right call for EDM production from the start.
|
Buffer Size
|
Latency
|
CPU Load
|
Best For
|
|
64-128 samples
|
Very low
|
High
|
Recording live instruments
|
|
256 samples
|
Low
|
Medium
|
General production
|
|
512-1024 samples
|
Moderate
|
Low
|
Mixing and arranging heavy projects
|
Step 2. Build your first beat in Session View
Session View is where most EDM producers spend the bulk of their creative time. Unlike Arrangement View, which works like a traditional timeline you record from left to right, Session View organizes your music into a grid of clips you can trigger and loop in any order. Each column represents one track, and each row is a scene you can launch all at once, which makes experimenting with new ideas fast and low-risk.
Understand the Session View layout
Each cell in the grid holds a single clip. Audio track clips play back recorded files like samples and vocals, while MIDI track clips contain note data that fires an instrument plugin you've loaded onto that track. The colored Launch button on the far left of each scene fires every clip in that row simultaneously, letting you jump between sections of your track without stopping playback.
|
Track Type
|
Clip Contains
|
Typical EDM Use
|
|
Audio
|
Recorded audio file
|
Samples, loops, vocals
|
|
MIDI
|
Note and velocity data
|
Drums, synths, bass
|
|
Return
|
No clips
|
Reverb and delay sends
|
Program a basic drum pattern
Right-click in the track list area and select Add MIDI Track, then drag a Drum Rack from the Instruments section of your browser onto it. Double-click an empty clip slot to create a blank clip, and click the pencil icon to open the MIDI editor. This is where every beat in this Ableton live tutorial starts taking shape.

Build a standard four-on-the-floor pattern using these steps:
- Set the clip length to 2 bars using the loop controls at the top of the MIDI editor.
- Place kick drum hits (C1) on beats 1, 2, 3, and 4 in each bar.
- Add snare hits (D1) on beats 2 and 4.
- Fill in an eighth-note hi-hat pattern (F#1) across both bars to push the beat forward.
- Press the clip's Launch button to hear it loop back continuously.
Select all your notes with Ctrl+A (Cmd+A on Mac), then press Ctrl+U (Cmd+U) to quantize everything to the grid so your hits land exactly on the beat.
Layer sounds and refine the groove
Once your basic pattern is running, add velocity variation to the hi-hats by clicking each note and dragging its velocity bar up or down. Alternating between roughly 100 and 75 velocity on neighboring eighth-note hits creates a natural accent pattern that keeps the groove from sounding stiff. That one adjustment makes a bigger difference to how your beat feels than adding extra sounds, and it takes less than a minute to apply.
Step 3. Write bass and chords with MIDI
With your drum pattern looping in Session View, the next move in this Ableton Live tutorial is adding bass and chords to fill out the low and mid frequencies. These two elements define your track's energy and harmonic feel more than almost anything else, and building them in MIDI means you can edit, transpose, and rearrange them at any point without re-recording a single note.
Build a bass line that locks with your kick
A bass line that works in EDM almost always anchors on the root note of your key and mirrors the rhythm of your kick drum closely. Create a new MIDI track, load Ableton's Analog instrument from your browser, and open a fresh 2-bar clip in the MIDI editor. Use this note template to write a basic bass line in C minor, one of the most common keys in dance music:
|
Beat Position
|
Note
|
Length
|
Velocity
|
|
Bar 1, Beat 1
|
C2
|
1/8
|
100
|
|
Bar 1, Beat 2.5
|
C2
|
1/16
|
80
|
|
Bar 1, Beat 3
|
G2
|
1/8
|
90
|
|
Bar 2, Beat 1
|
C2
|
1/4
|
100
|
|
Bar 2, Beat 3
|
Bb2
|
1/8
|
85
|
Place your bass notes directly on or just after each kick drum hit to lock the low end together and give your groove a tighter, more physical feel.
Keep velocity variation modest, staying between 75 and 100 across all your notes. Larger swings in velocity make the bass sound uneven and pull focus away from the kick and snare pattern you built in Step 2. Subtle differences in velocity, not dramatic ones, are what give a bass line its natural feel.
Layer chords with a pad or synth
Chords provide your track with harmonic context, which is what signals to the listener whether a section feels tense, uplifting, or dark. Add another MIDI track, load a pad or synth from Ableton's built-in instruments, and write a simple four-chord progression using long sustained notes that carry across each bar.
A reliable chord progression in C minor to start with:
- Bar 1: Cm (C - Eb - G)
- Bar 2: Ab major (Ab - C - Eb)
- Bar 3: Bb major (Bb - D - F)
- Bar 4: Gm (G - Bb - D)
Spread each chord across at least two to three octave registers by stacking your notes vertically in the MIDI editor. Thin chord voicings on a pad instrument sound weak against a full drum and bass arrangement, so filling the harmonic space now gives your mix something substantial to build on in Step 4.
Step 4. Arrange, mix, and export a track
Once your clips are running in Session View, you need to move them into Arrangement View to build a complete track structure. This is where your production goes from a collection of loops to an actual song with an intro, build, drop, and breakdown. Switch to Arrangement View by pressing Tab, and you'll see a horizontal timeline ready to receive your clips.
Move clips to Arrangement View
Drag your drum, bass, and chord clips from Session View into the Arrangement timeline, or use the Record to Arrangement function by pressing the record button at the top of the screen and then launching your scenes. Ableton writes everything you trigger in real time directly onto the timeline. Once your raw material is in place, resize and duplicate clips by holding Ctrl (Cmd on Mac) and dragging clip edges to extend sections.
A simple EDM arrangement structure to use as a starting point:
|
Section
|
Bars
|
What's Playing
|
|
Intro
|
1-8
|
Hi-hats and chords only
|
|
Build
|
9-16
|
Add drums, remove bass
|
|
Drop
|
17-32
|
Full arrangement
|
|
Breakdown
|
33-40
|
Chords only
|
|
Drop 2
|
41-56
|
Full arrangement
|
|
Outro
|
57-64
|
Strip back to intro elements
|
Mix your levels and add effects
With your arrangement laid out, set track volumes so your kick and bass sit at the front without clipping the master channel. A practical starting point is kick at -6 dBFS, bass at -8 dBFS, chords at -12 dBFS, and hi-hats at -14 dBFS. Keep your master output meter below 0 dBFS at all times during this stage.
Add Ableton's built-in Reverb as a send effect via a Return track rather than placing it directly on each individual track. Multiple tracks share one instance, and your CPU load stays manageable while the mix still breathes.
Export your finished track
The final step in this Ableton live tutorial is rendering your audio. Go to File > Export Audio/Video, set the file type to WAV, and choose 24-bit depth at 44100 Hz. Disable the Normalize option to preserve your mix's dynamic range for mastering later.
Use these export settings every time for a consistent result:
-
File type: WAV
-
Bit depth: 24-bit
-
Sample rate: 44100 Hz
-
Normalize: Off
-
Render source: Master
Your next session in Ableton
You now have a complete workflow: configured audio, a drum pattern, bass and chord parts, an arranged structure, and an exported WAV file. That first track won't be perfect, and it shouldn't be. What matters is that you followed every stage of this Ableton Live tutorial from a blank project to a finished file, and you understand why each step exists. That process compounds quickly once you repeat it.
For your next session, pick one element to improve, whether that's your drum groove, your chord voicing, or your mix levels. Trying to fix everything at once slows your growth. Keep listening to the music that motivates you while you build, because understanding what makes a track hit on the dance floor sharpens your instincts as a producer. If you need high-energy EDM tracks to study and train to while you work, check out our CARDIO HITS 2026 Playlist on Spotify and keep moving.
8