Crafting Ambient Techno Pads
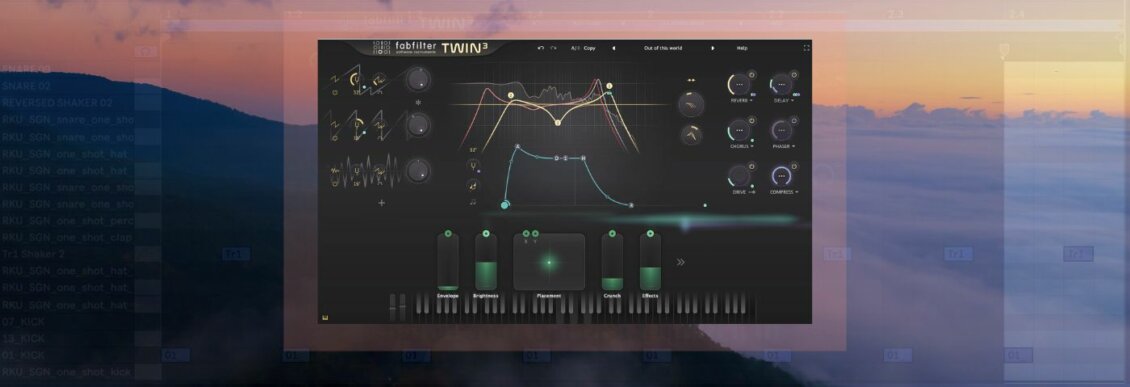
Ambient techno blends atmospheric soundscapes with minimal beats, creating immersive and meditative experiences. In this Synth Secrets, we’ll craft one of the main pillars of ambient techno—pads—from scratch using FabFilter Twin 3 and Pro-R 2.
Techno is often synonymous with hard grooves, hypnotic four-to-the-floor drums, and dark clubs. However, as with most electronic music, there is an assortment of associated microgenres. One such is ambient techno. It merges soundscapes with minimal percussion, focusing on mood and texture.
Several well-known artists, such as Carl Craig, The Orb, and Aphex Twin, helped popularise ambient techno, but there is a wealth of underground artists, such as Lewis Fautzi, Polar Inertia, and Feral, to name just a few, all pushing the boundaries of ambient techno.
In this Synth Secrets, we will build an ambient pad from scratch, step-by-step, using the quite excellent Twin 3 by FabFilter. The Swedish plugin powerhouse also has just the tool, the Pro-R 2, to help wash the sound and make it, well, more ambient. Sure, you can just load up a preset, but it really pays to know synthesis, as you can then control your sound with greater efficiency, knowing 'what does what.'
This is what we're creating:
If you want to follow along, you can get a free 30-day trial from FabFilter's website. In fact, you can download the entire FabFilter bundle for a free 30-day trial! Get it here.
? Top Tip: Use headphones to follow along and click any image to enlarge!
Step 1 - Writing the chords
Start by setting the tempo to 128BPM, loading the Twin 3 VST and selecting the “Clean” preset
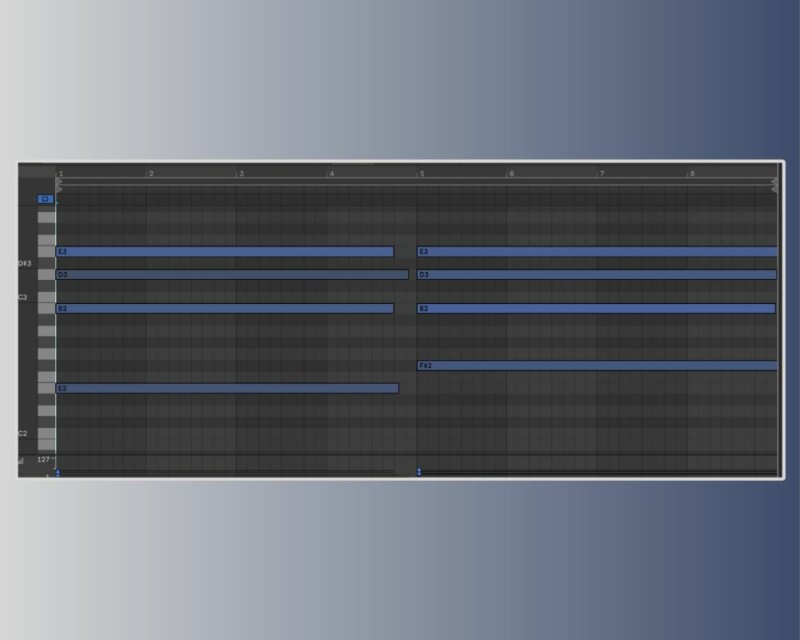
Create a MIDI clip and compose some chords. We've been using the E Dorian scale, and it's a very simple two-chord progression.
 Step 2 - Don't Wait - Oscillate
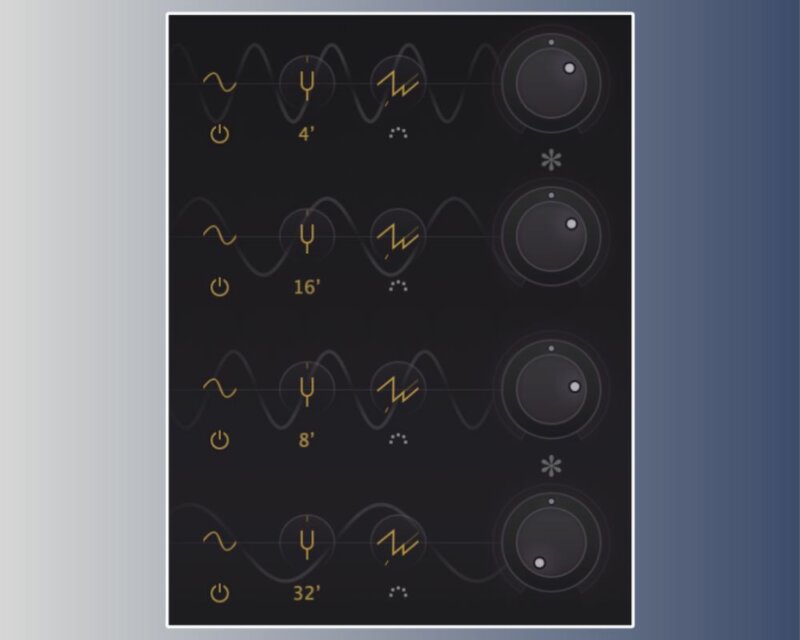
All four oscillators are necessary to create a rich pad. It's hard not to love four oscillators!
Begin with Osc 1. Select a sine wave and move it to +2 octaves. Decrease the volume to -12dB. This will generate the highest frequency pitch for the body of the sound. Next, click the + button to add Osc 2. Set it to 0 Oct and place the volume at -11dB. This will generate the midrange frequencies.
Next, click the + button to add Osc 3. Set it to +1 and place the volume at -8dB. This will generate mid- to high-frequency sounds. Lastly, click the + button one last time to add Osc 4. Set to -1 oct and place the volume at -INFdb. This will provide a low-frequency weight to the sound.
 Step 3 - Envelope timings
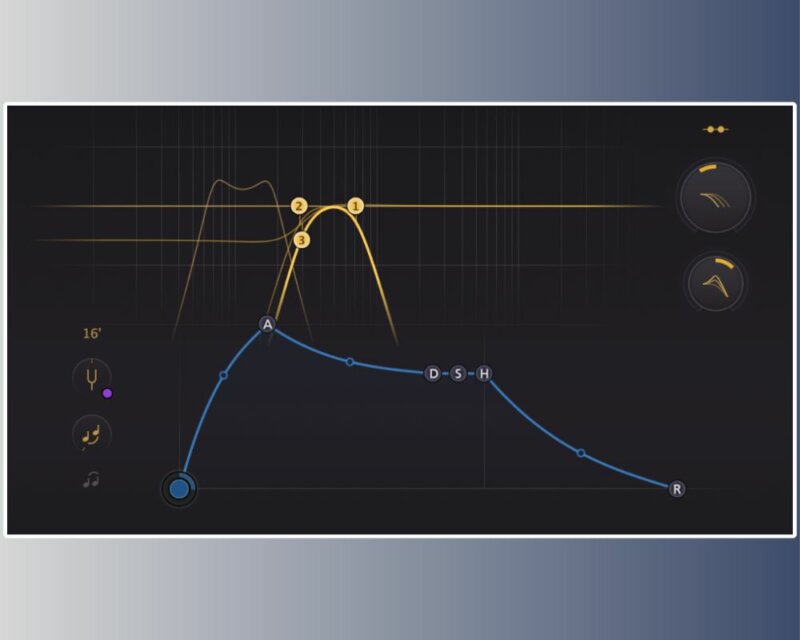
Move to the main envelope generator and attenuate to the following settings. This slow, gradual envelope is great for ambient, pad-like sounds.
- Attack: 5 sec
- Decay: 1.5 sec
- Sustain: -3dB
- Release: 1 sec
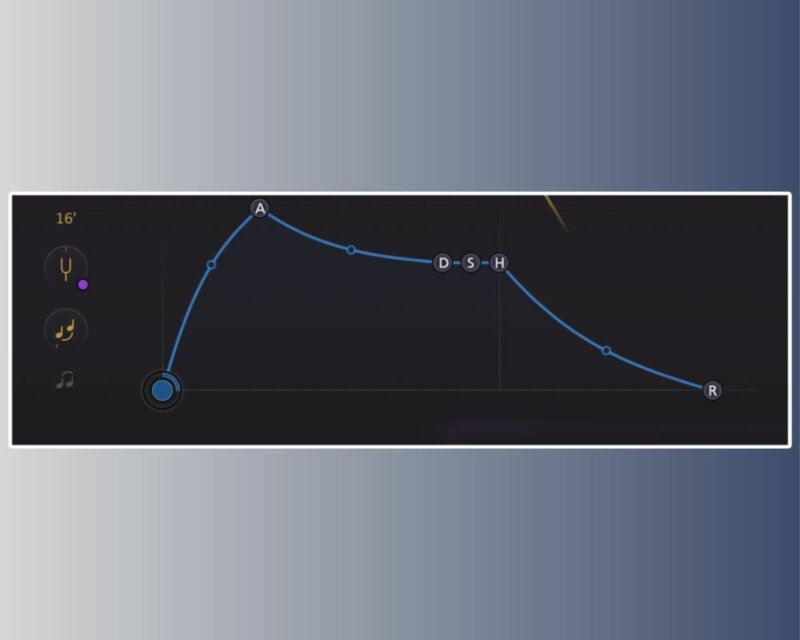
? Top Tip: Add a slope to the Attack and Decay. This will make the shape more natural sounding.
Step 4 - Filters
Start by ensuring Filter 1 is set to Low Pass, adjust it to 720Hz, and set the slope to 24dB. This will remove any harsh brightness.
Next, double-click to create Filter 2. Set this as a High Pass, adjust to 280Hz, and set the slope to 24dB.
Double-click again to create Filter 3 and change to a Low Shelf. Tune to 280Hz but set the slope to Wide. Finally, move over to the Filter Freq Offset and reduce this to -2 octaves. Increase the Filter Peak Offset to 30%.
 Step 5 - XLFO 1
The XLFO is like a classic LFO (Low-Frequency Oscillator) but on steroids. It can be a regular LFO, but it can also turn into a 16-step sequencer with an individual glide setting for every step. Let's use it!
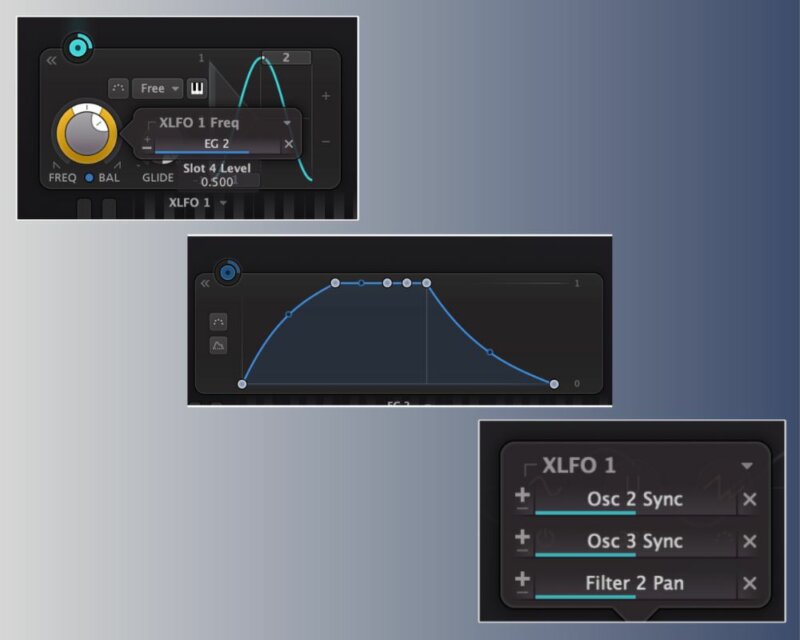
Press the add modulation button (A + button near the bottom right of the GUI) and choose new XLFO. First, route to Osc 2 Sync. Then, set Osc 2 Sync to 2 and set XLFO 1 Frequency to 13Hz.
Then, create a new envelope generator. Set as the following:
- Attack: 12 seconds
- Decay: 400 ms
- Sustain: 0dB
- Release: 2 seconds
Route this to XLFO 1 Frequency. Adjust Slot 4 level to 0.5. This will modulate the rate of LFO, moving from a fast speed, smoothly into a slower speed. Also route XLFO1 to Osc 3 Sync and set Osc 3 Sync to 2. Finally, route XLFO 1 to Filter 2 Pan to create some interesting stereo width.
 Step 6 - XLFO 2
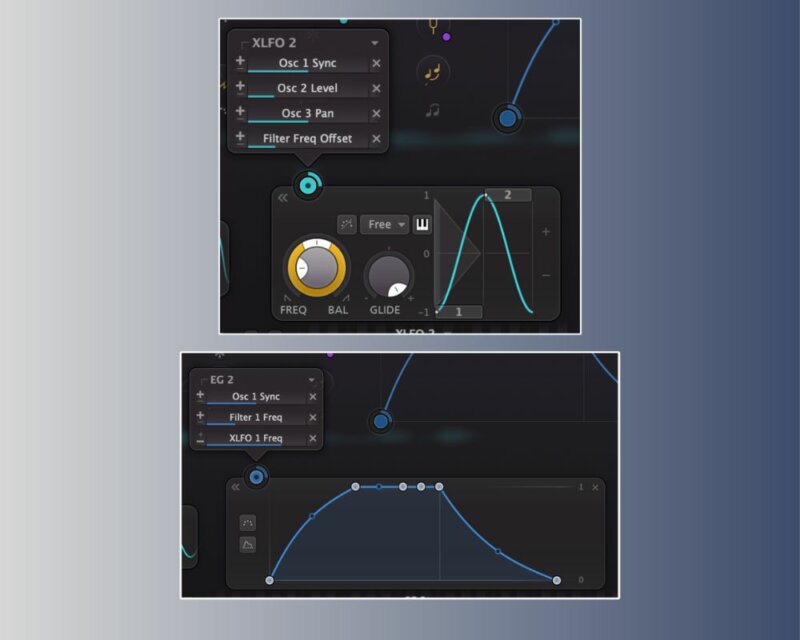
Why settle for one when you can have two. Press the add modulation button and once more, choose new XLFO. Set XLFO2’s Frequency to 0.5. Route to Osc 1 Sync and set Osc 1 Sync to 2.0. Route EG2 from the previous step into both Osc 1 Sync and Filter 1 Frequency.
Route XLFO 2 to Filter Frequency Offset and set Slot 12 level to 0.045. Once again, setting Slot 12 to such a low level will create subtle changes to the sound.
 Step 7 - Envelope Generator 3
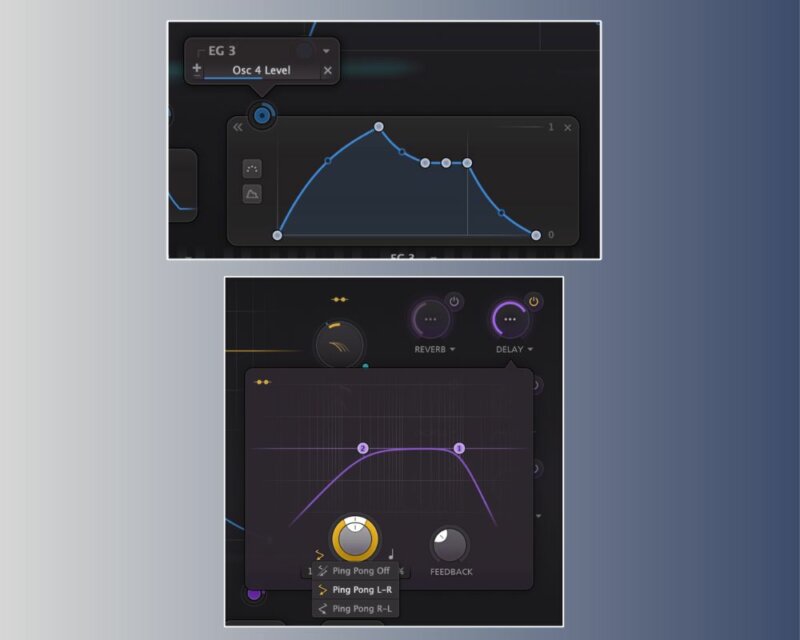
You guessed it. Another Envelope Generator! Press the add modulation button and select a new envelope generator. Set EG3’s attack to 15 seconds. The rest of the settings do not need to be changed. Now route into Osc 4 Level. Next, return to XLFO 1 and route into Osc 4 Sync. Finally, set Osc 4 Sync to 2.0
And while we are here, move to the left of the VST. Locate and turn on Delay. First, set to 50%. Increase the feedback to 70% and then change to Ping Pong L-R mode.
 Step 9 - Setting up FX: Reverb
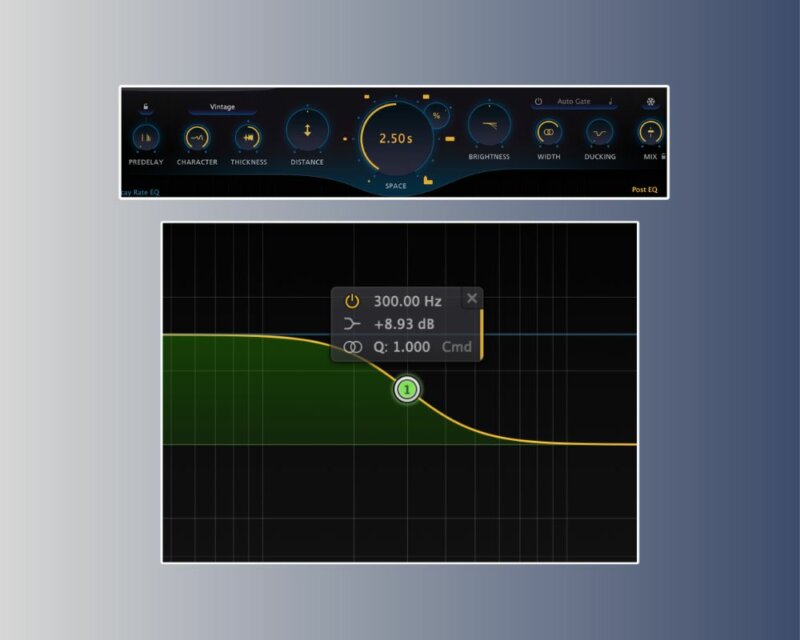
Insert Pro-R 2 directly onto the channel. From the preset menu, select Basic. Set the style to Vintage mode and increase the Character to 100%.
Set Filter 1 to Low Shelf, adjust to 300Hz and boost by 9dB. Finally, set Mix to 100%. This will give a warm, lush texture to the sound.
 Step 10 - Drums and Sidechain
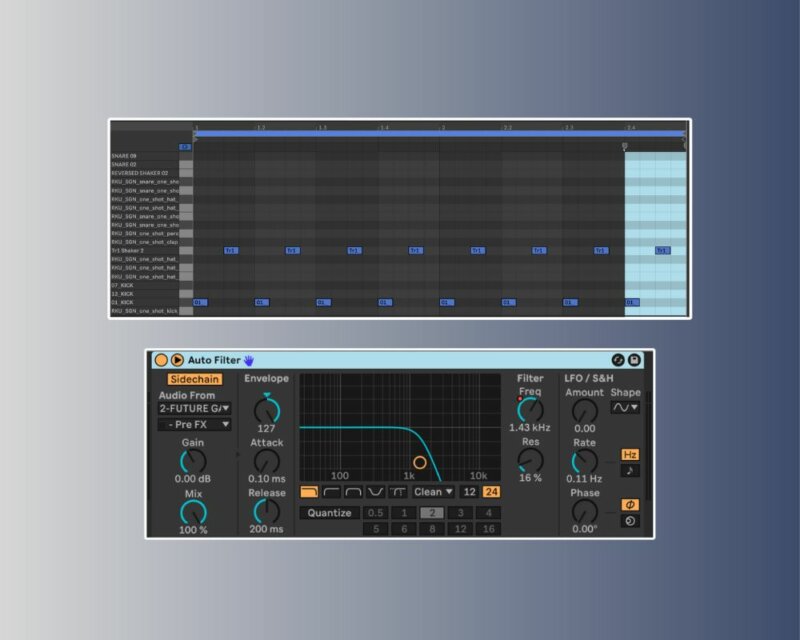
Create a simple drum patten with a drum rack of just a kick and shaker.
Add Ableton’s stock autofilter onto the Twin 3 channel. On the filter, press drop down arrow, turn on Sidechain and select audio from the drum rack and choose the kick, pre FX.
Set the filters envelope to 127. The frequency can then be automated and the entire synth will pump to the sound of the kick.
Finally, add in some percussion and create a topline melody as you desire.
If you like this Synth Secrets you may enjoy learning more about Twin 3 on our YouTube channel or on Attack.
[social-links heading="Follow Attack Magazine" facebook="https://www.facebook.com/attackmag" twitter="https://twitter.com/attackmag1" instagram="https://www.instagram.com/attackmag/" youtube="https://www.youtube.com/user/attackmag" soundcloud="https://soundcloud.com/attackmag" tiktok="https://www.tiktok.com/@attackmagazine"]
[product-collection]
74