What Is An Audio Interface? A Beginner’s Guide To
Sound
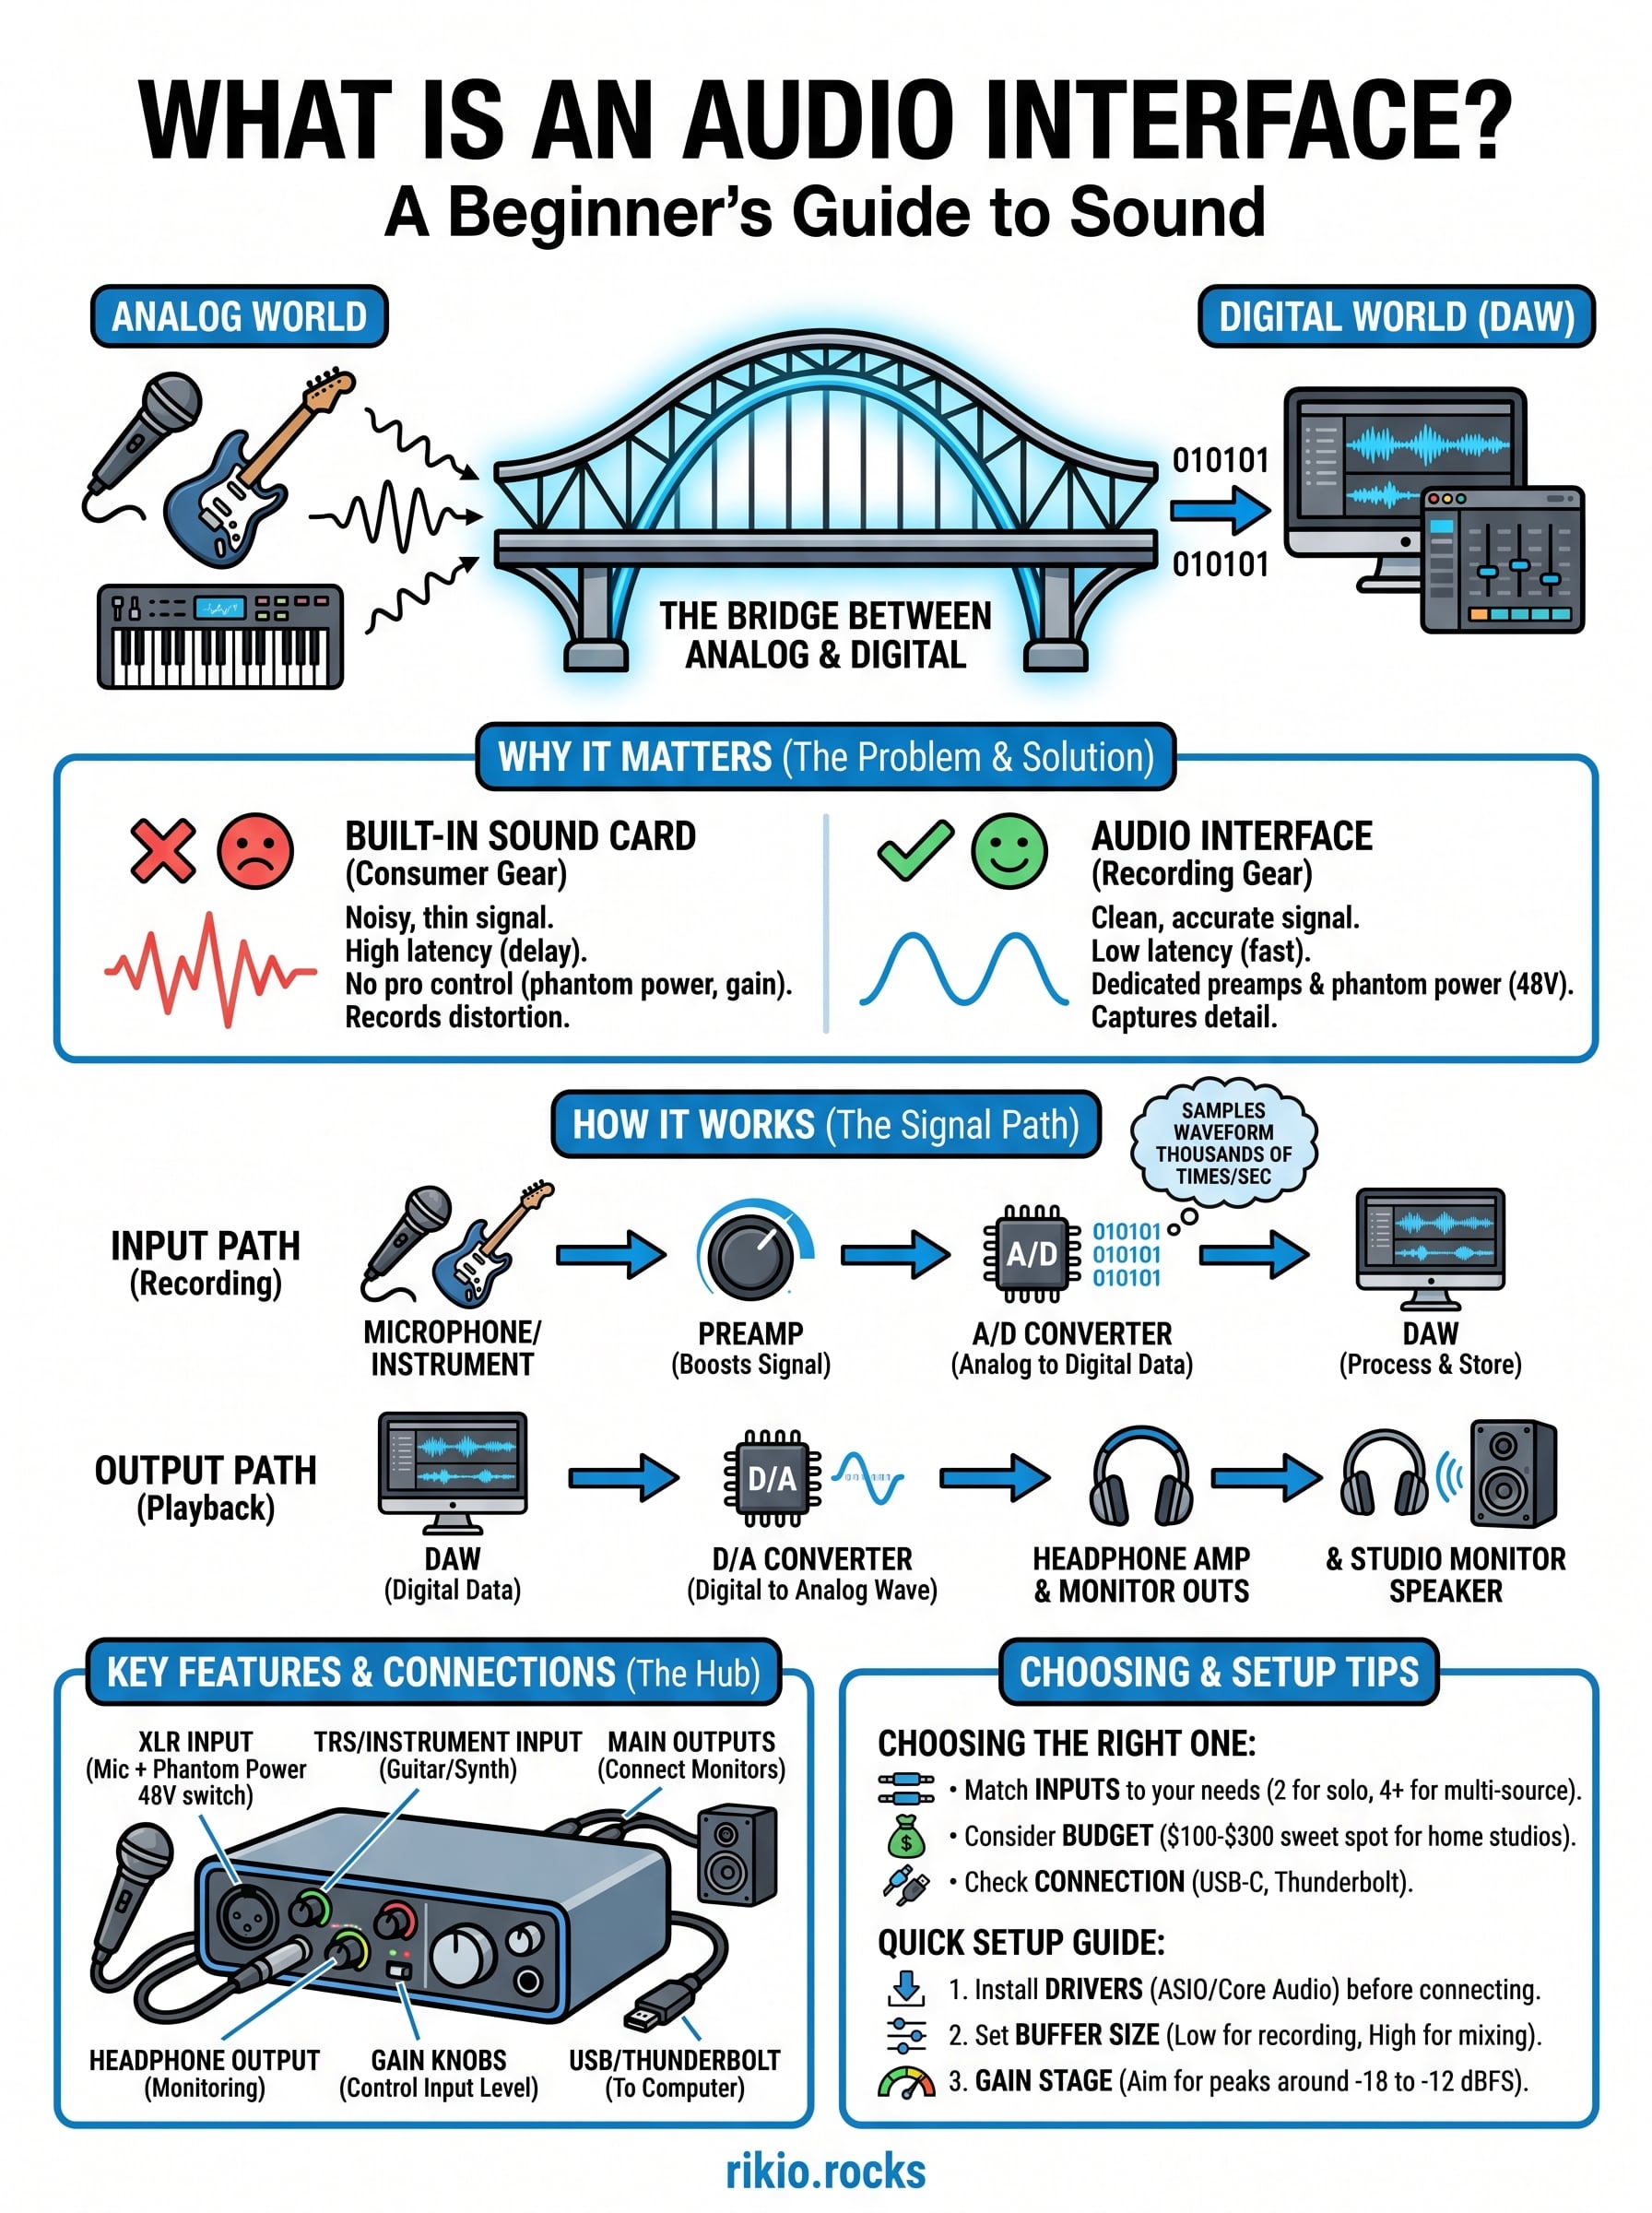
If you've ever tried recording vocals, laying down a synth line, or tracking a guitar into your computer, you've probably run into the question: what is an audio interface? It's one of those pieces of gear that sits quietly on your desk but makes everything else in your setup actually work. Without one, your DAW is essentially cut off from the real-world sounds you want to capture and shape.
An audio interface is the bridge between analog audio, microphones, instruments, monitors, and the digital environment where you produce, mix, and master your tracks. For EDM producers especially, it's the hardware that ensures what you hear is accurate and what you record is clean. Low latency and high-fidelity conversion aren't luxuries; they're the baseline for making music that hits right.
Here at RIKIO ROCKS, we cover every corner of the electronic dance music scene, and that includes the tools producers rely on to create the sounds that move dancefloors. Whether you're building your first home studio or finally upgrading from a built-in sound card, this guide breaks down exactly what an audio interface does, how it works, and how to pick the right one for your needs.
Why an audio interface matters for recording
When you're serious about making music, the gear you use to capture and monitor sound shapes every decision you make in the production process. Understanding what is an audio interface starts with recognizing the gap between consumer audio hardware and equipment that's built for recording. That gap is larger than most beginners expect, and closing it changes the quality of everything you produce, from the cleanest vocal take to the tightest kick drum sample.
Your built-in sound card isn't built for music production
Every laptop and desktop ships with a built-in sound card. It handles video calls, plays back system audio, and keeps your streaming music audible. But it was never designed to record microphones or instruments with accuracy or consistency. Built-in sound cards rely on low-grade analog-to-digital converters, introduce significant noise into the signal path, and offer virtually no control over input gain, phantom power, or direct monitoring.
When you plug a condenser microphone directly into your laptop's 3.5mm input, the result is a thin, noisy, often distorted signal that no EQ or noise reduction plugin will fully salvage in post-production. The damage happens the instant the signal enters your system, and that's exactly the problem a dedicated audio interface solves before it ever starts.
The quality of your recordings is determined at the point of capture, not in the mix. Fixing a bad source later costs more time than getting it right upfront.
Clean signal conversion changes how your music sounds
An audio interface replaces your built-in hardware with dedicated analog-to-digital (A/D) and digital-to-analog (D/A) converters engineered specifically for audio work. Better converters capture more detail in the original signal, handle transients more accurately, and dramatically lower the noise floor. For EDM producers, that translates directly into cleaner synth recordings, sharper vocal chops, and sample captures that hold up across the full frequency range.
Bit depth and sample rate factor in here too. A solid interface records at 24-bit/96kHz or higher, giving you far more dynamic range and resolution to work with than the 16-bit output typical of consumer-grade hardware. That headroom becomes especially important when you're layering multiple tracks, applying heavy compression, or sending a project out for mastering, since every extra bit of resolution reduces the cumulative degradation across the chain.
Low latency keeps your workflow moving
Latency is the delay between the moment you sing a note or play a chord and the moment you hear it back through your headphones or monitors. High latency destroys your ability to perform in real time, and it's one of the first things that frustrates new producers who skip an interface and record directly through their computer's built-in hardware.
A dedicated audio interface uses ASIO drivers on Windows or Core Audio on Mac to bypass the operating system's standard audio processing path entirely. That shortcut brings roundtrip latency down to as low as 2 to 5 milliseconds, a gap so small it becomes imperceptible during performance. At that level, you can track live vocals, play a MIDI keyboard, and monitor a full mix simultaneously without any lag pulling your focus away from the music itself.
What an audio interface actually does
At its core, understanding what is an audio interface means understanding the job of signal conversion. An audio interface takes an analog signal, whether that's a vocal through a microphone or a synthesizer through a line input, and converts it into digital data your DAW can read, process, and store. It also runs the reverse process during playback, converting your DAW's digital output back into an analog signal you hear through your headphones or studio monitors.
It acts as your central audio hub
An audio interface consolidates multiple audio functions into a single piece of hardware. Instead of juggling separate preamps, headphone amps, and monitor outputs, you get them all packed into one unit. Most interfaces include at least one XLR/TRS combo input for microphones or instruments, a headphone output with its own volume control, and balanced line outputs for connecting studio monitors directly.
Routing all your audio through one dedicated interface gives you consistent signal quality and a predictable gain structure, which simplifies both recording and mixing sessions.
For EDM producers, that centralization means your hardware synthesizers, drum machines, and vocal microphone all feed into the same clean signal path before reaching your DAW. Nothing gets buried in noise from a mismatched consumer audio chain, and every source you record starts from the same reliable baseline.
It powers and amplifies your microphones
Most condenser microphones, including the large-diaphragm models common in home studios, require phantom power to operate. An audio interface supplies 48V of phantom power directly through the XLR input, so you don't need a separate external power supply to get your condenser mic running. A single switch on the interface handles it.
Dynamic microphones don't need phantom power, but they still benefit from the clean preamp circuit built into your interface. A well-designed preamp amplifies a weak mic signal without adding hiss, buzz, or coloration, so the character of the microphone itself comes through clearly rather than getting buried under noise from low-quality gain stages. That accuracy matters most when you're recording detail-heavy sources like vocals or acoustic instruments.
How an audio interface works
To fully grasp what is an audio interface, you need to follow the signal from the moment it enters the device to the moment it reaches your DAW. The process involves two main stages running in tandem: analog-to-digital conversion on the way in and digital-to-analog conversion on the way out. Every component inside the interface is built to handle those two jobs with as little noise and distortion as possible.
The signal path from input to output
When you speak into a microphone or plug in a synthesizer, the incoming analog signal travels first through the preamp stage. The preamp boosts that signal to a usable level before handing it off to the A/D converter. The converter samples the analog waveform thousands of times per second, turning the continuous signal into a stream of binary data your DAW can read. At 96kHz, that means 96,000 discrete samples captured every second, each one carrying amplitude information encoded at 24-bit resolution.
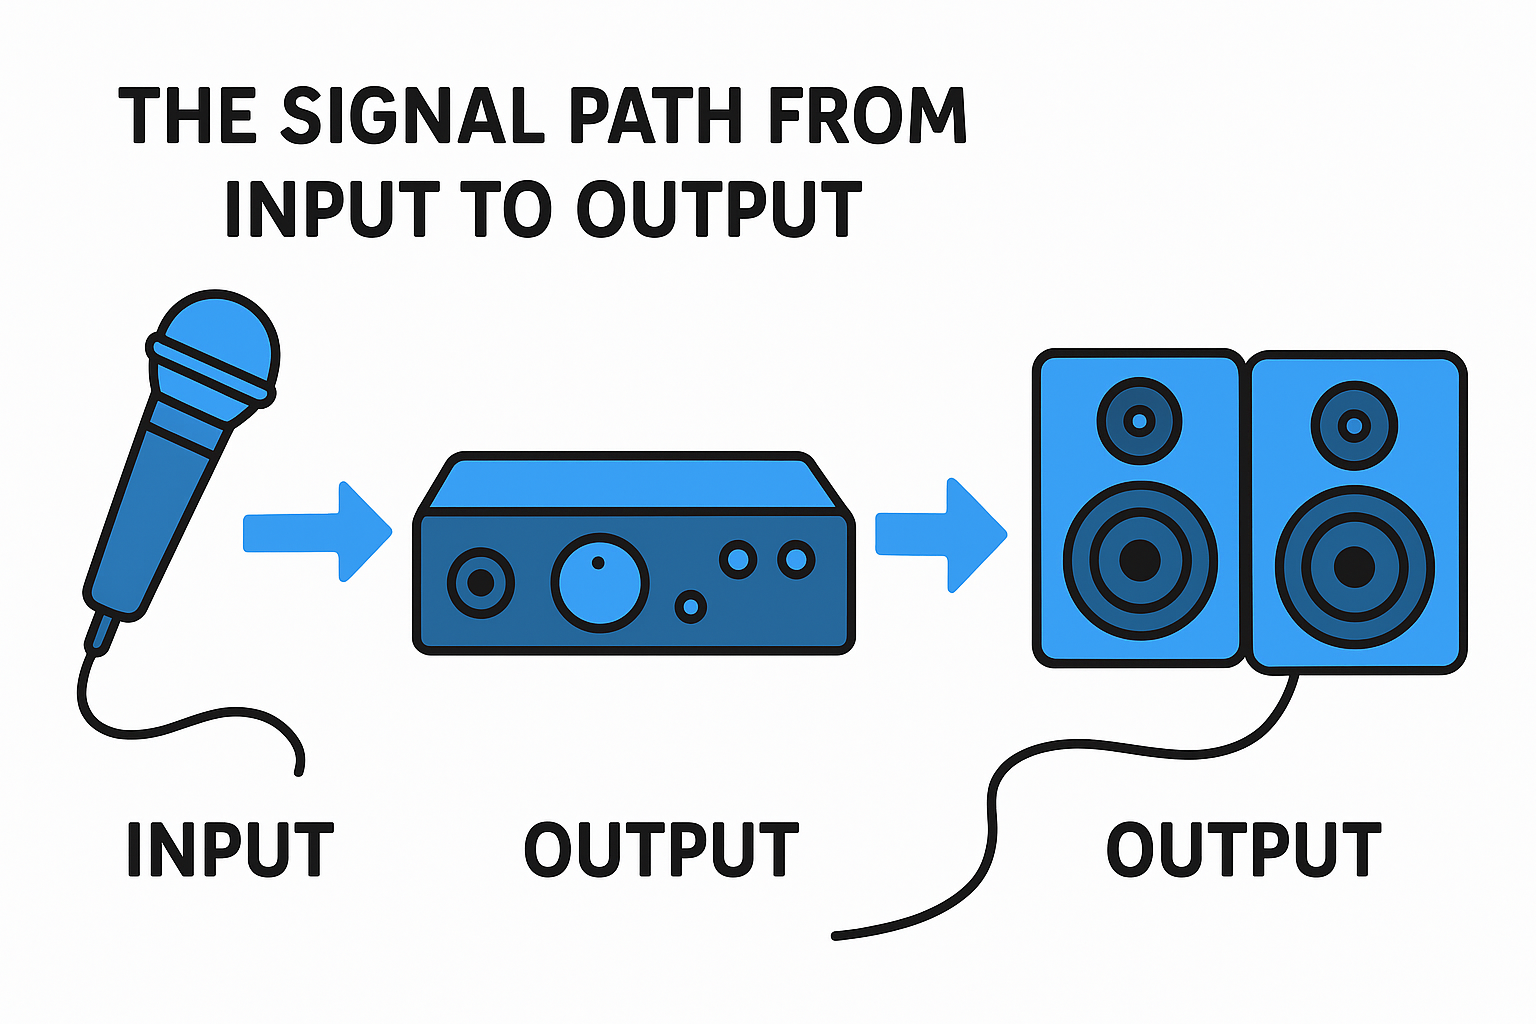
Playback runs in reverse. Your DAW sends digital audio data back to the interface, where the D/A converter reconstructs it as an analog waveform. That waveform travels out through the balanced line outputs to your studio monitors or through the headphone amp to your headphones. The entire round trip happens fast enough that you can perform in real time without noticing any lag when the interface is configured correctly.
The quality of those converters determines how accurately your original sound is captured and reproduced. Cheap converters compress dynamic range and introduce artifacts that affect every track you record.
Drivers and internal clocking
Your interface communicates with your computer through a dedicated audio driver, either ASIO on Windows or Core Audio on macOS. These drivers create a low-latency pathway that bypasses the general-purpose audio stack built into your operating system, which would otherwise add significant delay to every signal.
Internal clocking keeps all the conversion happening at a precise, steady rate. When the clock drifts or is unstable, a phenomenon called jitter occurs, which introduces subtle distortion into your audio. A quality interface maintains a stable internal clock so every sample gets captured and played back at exactly the right moment, keeping your recordings clean and your mixes accurate from start to finish.
Key features and connections to understand
Once you understand what is an audio interface, the next step is knowing which specs and ports actually affect your workflow. Not every interface is built the same, and the differences between models come down to specific features that either expand or limit what you can do in your studio. Reading the spec sheet before you buy saves you from outgrowing your gear six months after you set it up.
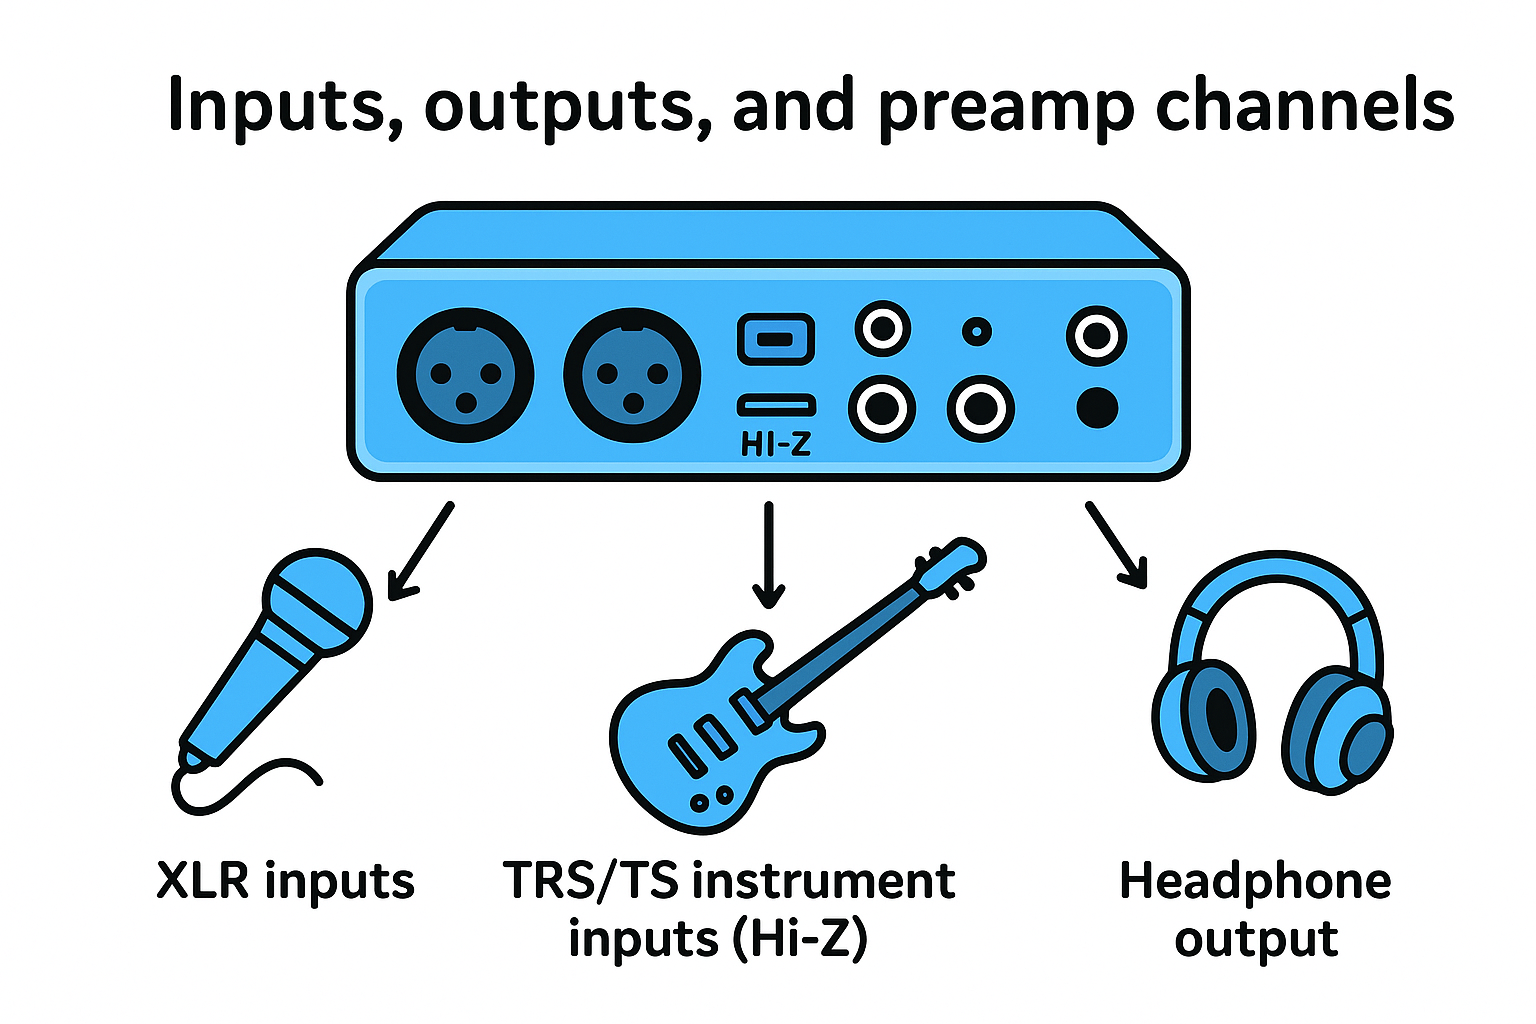
Inputs, outputs, and preamp channels
The number of inputs and outputs on an interface determines how many sources you can record at the same time and how many devices you can connect to your monitoring setup. A two-input interface works well for solo producers recording one microphone and one instrument simultaneously. If you record a live band, track drums with multiple microphones, or want to connect several hardware synthesizers at once, you need more channels to avoid constant unplugging and reconnecting.
Here is a quick breakdown of the most common connection types you will encounter:
-
XLR inputs: Used for microphones; carry balanced signals that reject noise over longer cable runs
-
TRS/TS instrument inputs (Hi-Z): Accept guitars, basses, and keyboards directly without an external DI box
-
Balanced line outputs (TRS): Connect to studio monitors for accurate, noise-resistant playback
-
Headphone output: Provides a separate mix for monitoring during tracking or mixing
Matching the number of inputs to your actual workflow needs, rather than buying the cheapest available option, prevents you from hitting hard limits right when your projects start getting more complex.
Sample rate, bit depth, and USB vs. Thunderbolt
Sample rate and bit depth set the resolution at which your interface captures and plays back audio. A 24-bit/96kHz interface gives you more dynamic range and detail than a 16-bit/44.1kHz setup, which matters most when you are layering tracks heavily or sending your project to a mastering engineer.
The connection type between your interface and computer also affects performance. USB 2.0 handles most home studio workloads comfortably, while USB-C and Thunderbolt connections offer faster data transfer and lower latency, which becomes more important as your track count and plugin load increase.
How to choose the right audio interface
Knowing what is an audio interface gets you started, but picking the right one for your specific setup requires thinking through a few practical questions before you spend any money. Your current recording workflow and where you expect to take your production in the next year or two should both factor into the decision, because buying too small means you outgrow it fast and buying too large means you pay for inputs you never touch.
Match the interface to your input count
The most important decision you make when shopping is how many simultaneous inputs you actually need. If you record vocals and a single instrument at the same time, a two-input interface covers your workflow completely. EDM producers who want to record hardware synths, a microphone, and an external drum machine simultaneously need at least four inputs, and ideally more to avoid constant cable swapping between takes.
Think about your real sessions, not your ideal ones. A mismatch between your interface and your typical recording scenario means you either sit waiting while you swap cables or you record sources in separate passes when they should run at the same time.
Buying one step above your current needs gives you room to grow without forcing an upgrade every time you add a piece of hardware to your studio.
Consider your budget and connection type
Budget shapes every other decision, but the sweet spot for most home studio producers sits between $100 and $300. Interfaces in that range deliver solid preamps, 24-bit/96kHz conversion, and stable drivers without the premium you pay for professional studio-grade hardware. Below $100, converter quality and preamp noise become noticeable problems on every take.
Your computer's available ports also determine which interfaces you can even use. USB-C is the standard on most modern laptops, so confirm the interface you choose matches your available connection before you buy. Thunderbolt interfaces deliver lower latency and higher data bandwidth, which matters if you run large session files with a heavy plugin load.
Factor in headphone and monitor outputs
Direct monitoring through your interface's headphone output is something you will use on every single recording session, so check that the headphone amp delivers enough volume and clarity for your headphones. Some interfaces include two separate headphone outputs, which lets a vocalist and an engineer monitor independently without sharing a single mix.
How to set up and use an audio interface
Getting your interface running correctly takes less time than most beginners expect, but the order you follow matters. Skipping a step, especially driver installation, causes your DAW to either ignore the interface entirely or use the wrong audio device, which defeats the purpose of the upgrade. Once you understand what is an audio interface and what it does, putting it to work in your studio is straightforward.
Connect your interface and install the drivers
Plug your interface into your computer before installing anything, then download the official drivers directly from the manufacturer's website rather than relying on whatever ships automatically. On Windows, you need the ASIO driver to get low-latency performance. On macOS, Core Audio handles communication natively, but manufacturer software often gives you additional routing control and monitoring features worth installing. After the driver installs, restart your computer and confirm your operating system recognizes the interface as an audio device in your system sound settings.
Installing drivers before connecting the device can cause conflicts on some systems, so follow the manufacturer's documented sequence exactly.
Configure your DAW and set your buffer size
Open your DAW, navigate to the audio settings or preferences panel, and select your interface as both the input and output device. Then set your buffer size based on what you are doing. A lower buffer size, such as 64 or 128 samples, reduces latency during live recording sessions so you can monitor yourself without noticeable delay. A higher buffer size, around 512 or 1024 samples, reduces the processing load during mixing when you are running many plugins and do not need real-time input monitoring.
Gain staging and monitoring during recording
With your interface selected in your DAW, set your input gain using the knob on the front of the unit while your source plays at its loudest. Watch the input meter and aim for a signal that peaks around -18 to -12 dBFS, which gives you enough headroom to avoid clipping. Enable direct monitoring through your interface rather than software monitoring to hear yourself in real time without any lag, then arm a track in your DAW and record your first take.
Key takeaways
Understanding what is an audio interface comes down to one core idea: it bridges the analog and digital worlds so your recordings start clean and your monitors play back accurately. Without one, your built-in sound card introduces noise, limits your control over gain, and adds latency that disrupts live performance. A dedicated interface solves all three problems with better converters, clean preamps, and low-latency drivers.
Your choice of interface should match your actual input count, your computer's connection type, and your budget. Most home studio producers find everything they need in the $100 to $300 range. Setting it up correctly, from driver installation to gain staging, takes under an hour and immediately changes how your sessions feel and sound.
If you produce EDM or just want high-energy music to fuel your creative work, check out CARDIO HITS 2026 on Spotify for a playlist built to keep your energy moving.
9