REAPER User Guide: A Beginner’s Path To Recording &
Mixing
REAPER is one of the most capable digital audio workstations available, and it costs a fraction of what competitors charge. For EDM producers and bedroom beatmakers alike, that combination is hard to ignore. But pulling up the software for the first time can feel overwhelming, dozens of menus, routing options, and customization settings staring back at you. A solid reaper user guide is the difference between actually making music and spending hours lost in preference windows.
Here at RIKIO ROCKS, we cover every corner of the electronic dance music scene, from festivals and artist news to the tools producers use to build tracks. REAPER has quietly become a go-to DAW for electronic music creators who want deep functionality without the subscription fees or bloated installs. Whether you're sketching out your first drop or trying to get a clean mixdown on a demo, understanding this software gives you a real edge.
This guide walks you through everything you need to get started: downloading and installing REAPER, setting up your audio interface, navigating the interface, recording your first tracks, and getting into basic editing and mixing. We'll also point you toward the official PDF user guide and other beginner-friendly resources that go deeper on specific topics. By the end, you'll have a clear, practical foundation to start producing, no guesswork, no fluff, just the steps that actually matter.
What REAPER is and how to use this guide
REAPER (Rapid Environment for Audio Production, Engineering, and Recording) is a full-featured digital audio workstation developed by Cockos Incorporated. It runs on Windows, macOS, and Linux, which makes it one of the most flexible options available to producers right now. Unlike DAWs that gate core features behind expensive subscription tiers, REAPER ships as a single compact download with full functionality included, and its license costs $60 for individuals earning under $20,000 annually from its use, or $225 for a commercial license. That pricing model explains why so many electronic music producers, podcasters, and sound designers have made it their primary tool.
What makes REAPER different from other DAWs
REAPER does not bundle a massive library of loops, samples, or virtual instruments with the install. Instead, it gives you a highly configurable audio engine that you shape around your own workflow and plugin collection. You can drag and drop audio files, build complex routing chains, load third-party VST and VST3 plugins, and record both audio and MIDI without hitting artificial feature walls. Every part of the interface, from toolbar buttons to color themes to keyboard shortcuts, can be adjusted to match exactly how you like to work.
REAPER's installer is under 15 MB, which means you can run it on older hardware that heavier DAWs would struggle with.
The official documentation is thorough and freely available. Cockos publishes a REAPER user guide in PDF format that covers every feature in depth, and you can download it directly from the Cockos website. The platform also has an active community forum and a user-maintained wiki where you can search for answers to very specific questions. For beginners, those resources are useful reference points once you have a working understanding of how the software is structured, which is exactly what this guide gives you.
How this guide is structured
This guide follows a logical sequence: audio setup first, then project organization, then recording, then editing, then mixing, then export. Each step builds on the one before it, so if you follow the sections in order the first time through, nothing will catch you off guard. Decisions you make in the early steps, like sample rate, buffer size, and folder structure, directly affect how smoothly the later steps go, which is why setup comes before anything else.
Each section gives you specific settings, values, and actions to take rather than broad suggestions. You will find recommended configurations, example naming conventions, and clear instructions written for someone sitting at the software for the first time. If you already have DAW experience and want to jump to a particular topic like routing or automation, each section is also written to be self-contained enough to be useful on its own. The goal by the end is that you have a working project, a clean signal chain, and a repeatable process you can apply to every track you build from here forward.
Step 1. Set up audio and MIDI for low latency
Before you record a single note, REAPER needs to know what audio hardware you are using and how to communicate with it. Getting this right at the start prevents the two problems that trip up most beginners: audio dropout clicks and noticeable delay between playing a note and hearing it, which is called latency. Open REAPER, then go to Options > Preferences > Audio > Device to begin.
Configure your audio device settings
Your audio interface driver type is the first thing to set. On Windows, select ASIO if your interface supports it, since ASIO gives you the lowest latency available on that platform. On macOS, CoreAudio handles this automatically and performs well without extra configuration. If you do not own an external interface and are using your computer's built-in audio on Windows, download and install ASIO4ALL, which is a free driver wrapper that gives you ASIO-level control over built-in hardware.
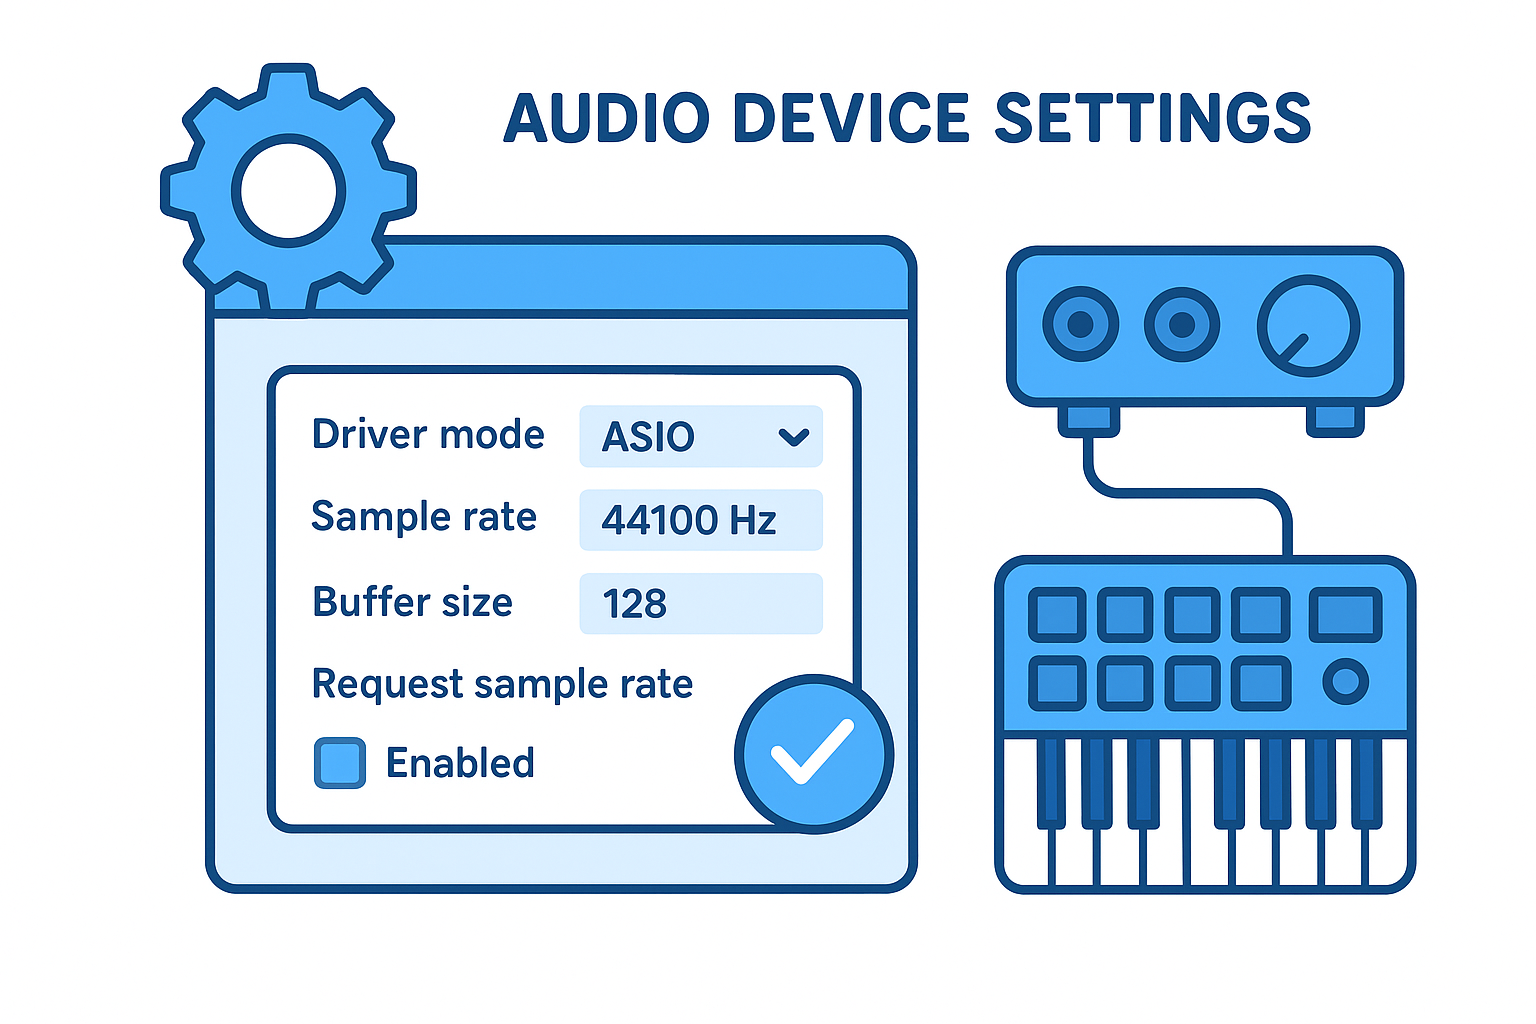
Setting your buffer size between 128 and 256 samples covers most recording situations without introducing noticeable delay or risking dropouts.
The table below shows the recommended starting settings for the Audio Device preferences panel:
|
Setting
|
Recommended Value
|
|
Driver mode
|
ASIO (Windows) / CoreAudio (macOS)
|
|
Sample rate
|
44100 Hz or 48000 Hz
|
|
Buffer size
|
128 to 256 samples
|
|
Request sample rate
|
Enabled
|
After applying these settings, click the Apply button and play audio through REAPER to confirm you hear output without clicks or gaps. If you experience dropouts, increase the buffer size to 512 samples and test again.
Connect and enable your MIDI controller
Navigate to Options > Preferences > Audio > MIDI Devices to set up your keyboard or pad controller. REAPER lists every connected MIDI device it detects on your system. Right-click your controller in the list and select Enable to activate it as an input source.
Once enabled, your MIDI input will be available on any track you create. You can verify it is working by creating a new track, arming it for recording, and pressing keys on your controller. The track's input meter should respond immediately, confirming the connection is live and ready for the next step.
Step 2. Create a project that stays organized
Good organization at the project level saves you significant time later, especially when a session grows to 30 or 40 tracks. When you open a new project in REAPER, the first thing to do is go to File > Save Project As and create a dedicated folder for that session. Keeping all your files in one place prevents the "media offline" errors that appear when REAPER cannot locate audio files it expects to find. Most steps in this reaper user guide assume your project is saved before you start recording anything.
Saving your project before you record a single note ensures REAPER writes all media files into the correct folder from the start.
Set your project sample rate and media path
Before any recording happens, confirm that your project sample rate matches the setting you configured in the audio device preferences during Step 1. Go to File > Project Settings and check the Project sample rate field. Set it to 44100 Hz or 48000 Hz to match your interface. In the same window, point the Project media path to a subfolder called "audio" inside your main project folder so every recorded file lands in one predictable location.
|
Setting
|
Recommended Value
|
|
Project sample rate
|
44100 Hz or 48000 Hz
|
|
Project media path
|
./audio
|
|
Timebase for items
|
Time
|
Name and color-code your tracks before recording
Creating tracks with clear, specific names before you record makes navigation significantly faster as the session builds. For an EDM production, name tracks after their function: Kick, Snare, Bass, Lead Synth, Pad, Vocal rather than Track 1, Track 2. Once named, right-click the track panel and select Track color to assign a color group. Grouping drums in red, melodic elements in blue, and vocals in green gives you instant visual orientation when you are deep in editing.
Building a consistent naming system across every project means you can open an old session months later and understand the layout immediately without playing every track to figure out what it contains. Pair naming with track folders in REAPER to group related tracks under a single parent, so you can collapse a drum bus or synth group and reduce clutter when the session gets dense.
Step 3. Record audio, MIDI, and virtual instruments
With your audio and MIDI configured and your project organized, you are ready to capture material. REAPER handles three types of recording: live audio from a microphone or instrument, MIDI data from a controller, and audio rendered directly from virtual instruments (VSTs). Each type requires slightly different track setup, and knowing those differences upfront keeps you from chasing mysterious signal issues mid-session.
Record a live audio track
Start by right-clicking in the track panel on the left and selecting Insert new track. Click the track's input selector button (the small field near the record arm button) and choose the input channel that matches your microphone or instrument on your audio interface. Set the input monitoring button to active so you can hear yourself through REAPER while you play. Arm the track by clicking the red record button on the track, then press the global record button in the transport bar to start capturing.
Always check your input level meter before recording. Aim for peaks around -12 dBFS to leave headroom and avoid clipping.
After you stop recording, REAPER places a media item on the timeline that you can immediately play back, trim, and reposition. If you need multiple takes of a vocal, enable loop recording by pressing the loop button in the transport and recording over the same region. REAPER stacks each pass as a separate take lane for easy comping later.
Record MIDI and load a virtual instrument
Create a new track and click its input selector, then choose MIDI input and select your controller from the list. To hear sound, you need to load a virtual instrument on the track. Click the FX button on the track to open the plugin browser, search for any VST synthesizer you have installed, and double-click it to load it. With the instrument loaded, arm the track, press record, and play your controller.
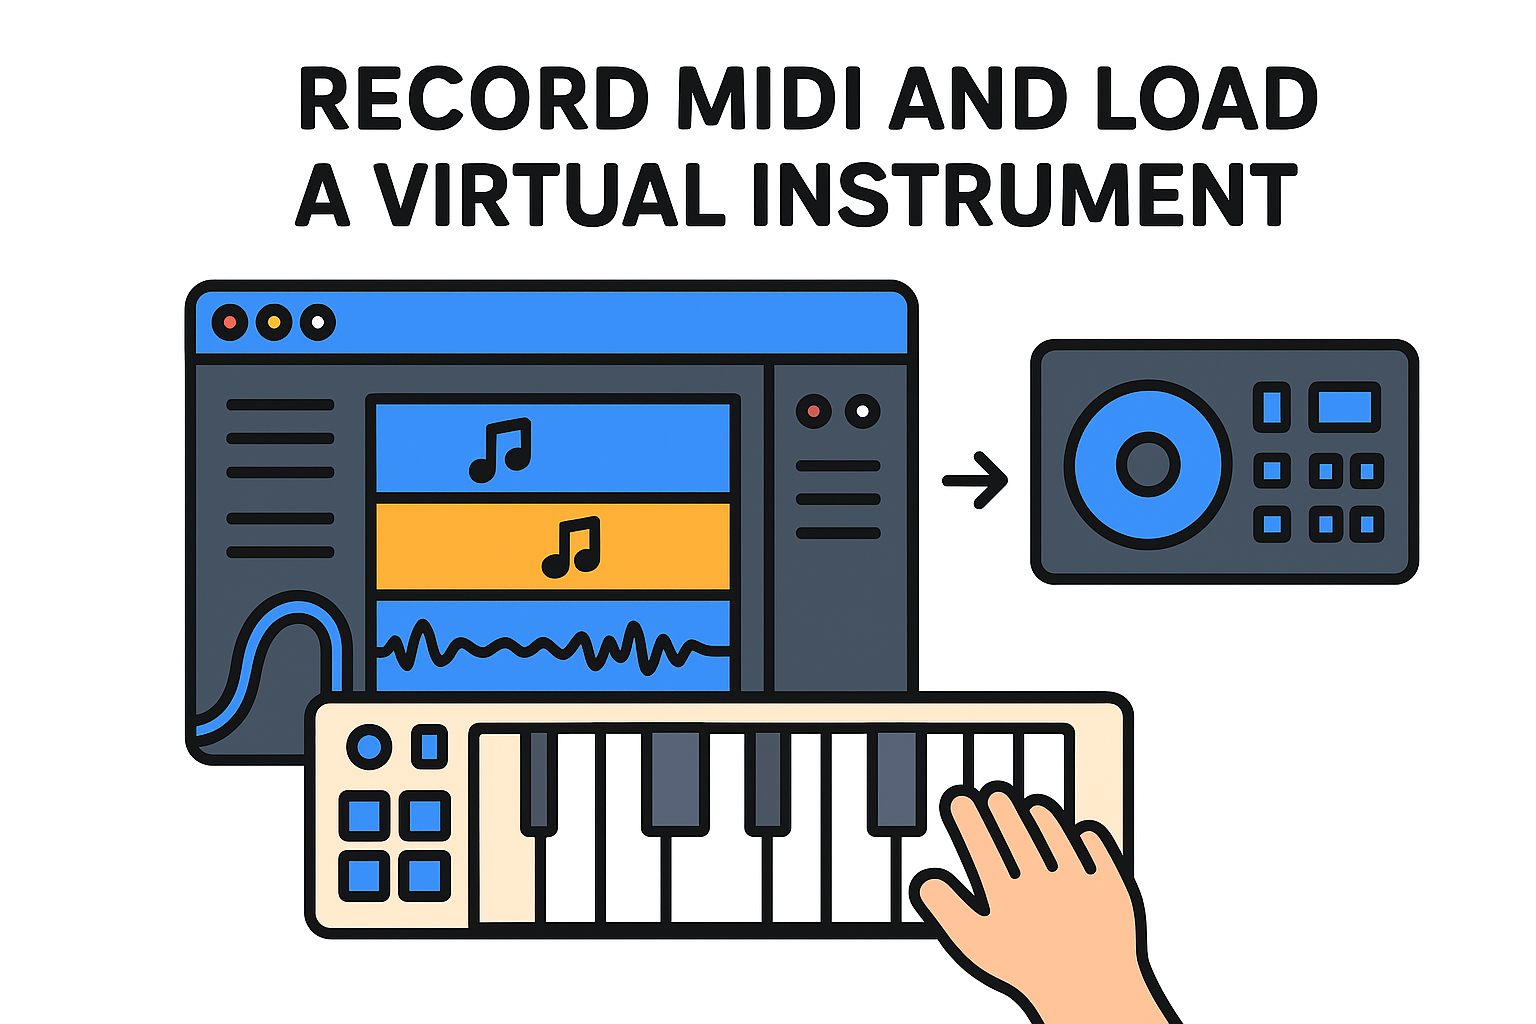
Following this reaper user guide approach, every MIDI note you play lands as an editable item on the timeline. You can open it in the MIDI editor by double-clicking the item, where you can fix timing, adjust velocity, and add or delete notes with precision before you move on to editing.
Step 4. Edit items cleanly and comp takes fast
REAPER's editing tools give you precise control over every item on the timeline without requiring you to switch between dedicated modes for different tasks. The same mouse and keyboard actions work across audio items, MIDI items, and rendered clips, so once you learn the core commands, they apply everywhere in your project.
Trim, split, and move items on the timeline
The most-used editing actions in REAPER all live within reach of your keyboard. Splitting an item at the cursor position is as simple as pressing S while the cursor sits at the point you want to cut. You can grab either side of the split, drag it left or right to trim it, and press Ctrl+Z to undo if the cut lands in the wrong place. Moving items is equally direct: hold Alt while dragging to slip the contents of an item without shifting its position on the timeline, which is useful when a recorded phrase is slightly ahead or behind the beat.
Learning five or six keyboard shortcuts in REAPER covers the majority of your day-to-day editing, which makes the workflow faster than navigating menus every time.
The table below covers the essential editing shortcuts this reaper user guide recommends memorizing first:
|
Action
|
Shortcut
|
|
Split item at cursor
|
S
|
|
Remove item
|
Delete
|
|
Slip item contents
|
Alt + Drag
|
|
Ripple delete selection
|
Ctrl + Shift + Delete
|
|
Group selected items
|
G
|
Comp takes using take lanes
When you record multiple passes of a vocal or instrument line using REAPER's loop recording, each take stacks as a separate take lane beneath the main item. Click the small arrow at the bottom-left corner of the item to expand those lanes and see every recorded pass laid out side by side. You can audition each take by clicking the circle icon next to it, and the currently selected take plays back through the track.
Building a comp from multiple takes means clicking individual phrases within different lane items to combine the best moments into one continuous performance. REAPER automatically mutes the sections you do not select, so the final item on the main lane reflects exactly the combination you chose without permanently deleting any of the raw recordings.
Step 5. Build routing with buses, folders, and sends
Routing is where REAPER separates itself from most other DAWs in terms of raw flexibility. Once your tracks are recorded and your takes are comped, building a clean signal flow through buses, folders, and sends lets you control groups of tracks together, apply shared processing, and create depth with effects like reverb and delay. This step in the reaper user guide sequence matters more than most beginners expect, because routing decisions affect everything from CPU efficiency to how your mix sounds in the final render.
Use track folders to group and bus your drums
REAPER's folder system lets you assign multiple tracks to a parent track that acts as a group bus. To create one, insert a new track above your drum tracks and name it "Drum Bus." Then in the Track Control Panel, drag each drum track so it sits indented beneath the parent. The folder track controls the combined output level for all child tracks at once, so a single fader adjustment moves your entire drum group without touching individual tracks.
Setting up folders before you start mixing saves significant time, since you can mute, solo, or apply compression to all drums with one action instead of repeating it on every track.
Once your folder is active, any FX plugin you add to the parent track processes the summed signal from all children. Load a bus compressor on the Drum Bus track to glue your kick, snare, and hi-hats into one cohesive element rather than treating each piece of the kit in isolation.
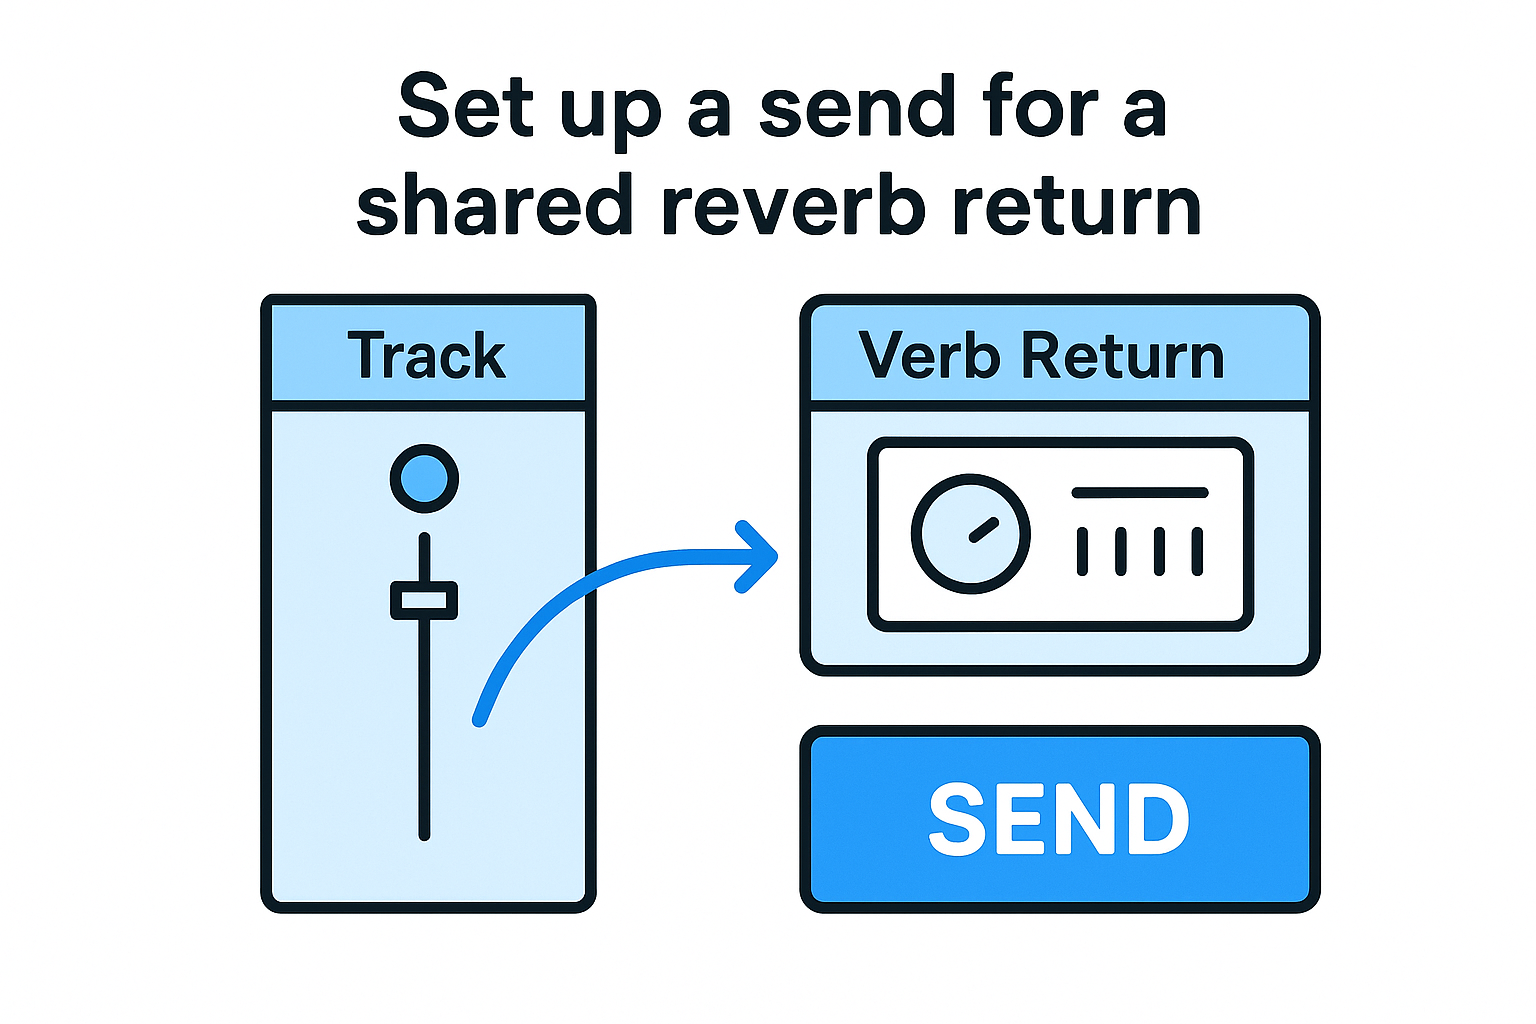
Set up a send for a shared reverb return
Rather than loading a reverb plugin on every track separately, REAPER lets you create a dedicated reverb return track that multiple sources feed into via sends. Create a new track, name it "Verb Return," load your reverb plugin on it, and set the plugin's mix to 100% wet. On any track you want to route into that reverb, click the Route button on the track strip, then add a send pointing to the Verb Return track.
|
Send Setting
|
Recommended Value
|
|
Send level
|
-12 to -6 dBFS as a starting point
|
|
Verb Return input
|
Stereo
|
|
Verb plugin wet/dry
|
100% wet
|
|
Post-fader send
|
Enabled
|
Adjusting the send level on each source track controls how much of that instrument bleeds into the reverb, which keeps your CPU load low while maintaining a consistent room sound across your entire mix.
Step 6. Shape sound with EQ, compression, and reverb
Processing your tracks with EQ, compression, and reverb transforms raw recordings into something that sits together in a mix. REAPER gives you a built-in parametric EQ plugin called ReaEQ and a compressor called ReaComp, both of which are free with the software and capable enough to handle professional results. Load either by clicking the FX button on any track and searching by name in the plugin browser.
Cut problem frequencies before you boost anything
Your first move with EQ on most tracks should be removing unwanted low-end buildup rather than adding brightness. On synth pads and melodic elements, apply a high-pass filter to cut everything below 80 to 100 Hz. This frees up space for your kick and bass to occupy that frequency range without competing. REAPER's ReaEQ handles this cleanly with a simple low-cut band that you drag upward in the plugin window until the rumble disappears from the visual analyzer.
Cutting before boosting keeps your overall mix from building up excess energy at frequencies that most speakers cannot reproduce accurately anyway.
|
Track Type
|
High-Pass Cut Point
|
Common Problem Area
|
|
Pad / Synth
|
80 to 120 Hz
|
Low rumble
|
|
Vocal
|
100 to 150 Hz
|
Proximity buildup
|
|
Hi-hat / Cymbal
|
200 to 300 Hz
|
Boxy muddiness
|
|
Lead Synth
|
60 to 100 Hz
|
Sub-frequency clutter
|
Set compression to control peaks and add punch
ReaComp on a drum bus works best with a fast attack between 5 and 15 ms, which lets the initial transient punch through before the compressor clamps down. Set your release to around 100 ms so the compressor recovers in time for the next hit. A ratio of 4:1 with 3 to 6 dB of gain reduction gives you control without flattening the energy out of your drums.
Following this reaper user guide approach, load ReaComp on your Drum Bus folder track from Step 5, set the threshold until the gain reduction meter shows movement, then adjust the makeup gain to match the uncompressed level. On individual elements like a lead synth, lower ratios around 2:1 smooth out peaks without squashing the sound.
Step 7. Automate levels, FX, and transitions
Automation lets you program changes to any parameter over time, so your mix moves and evolves without you touching a single fader during playback. In an EDM context, this is where your track gains energy: volume builds before a drop, a filter sweeps open on a synth, or a reverb send swells at the end of a phrase. REAPER handles automation through envelopes, which are visual curves drawn directly on the timeline that follow the same timeline grid as your audio and MIDI items.
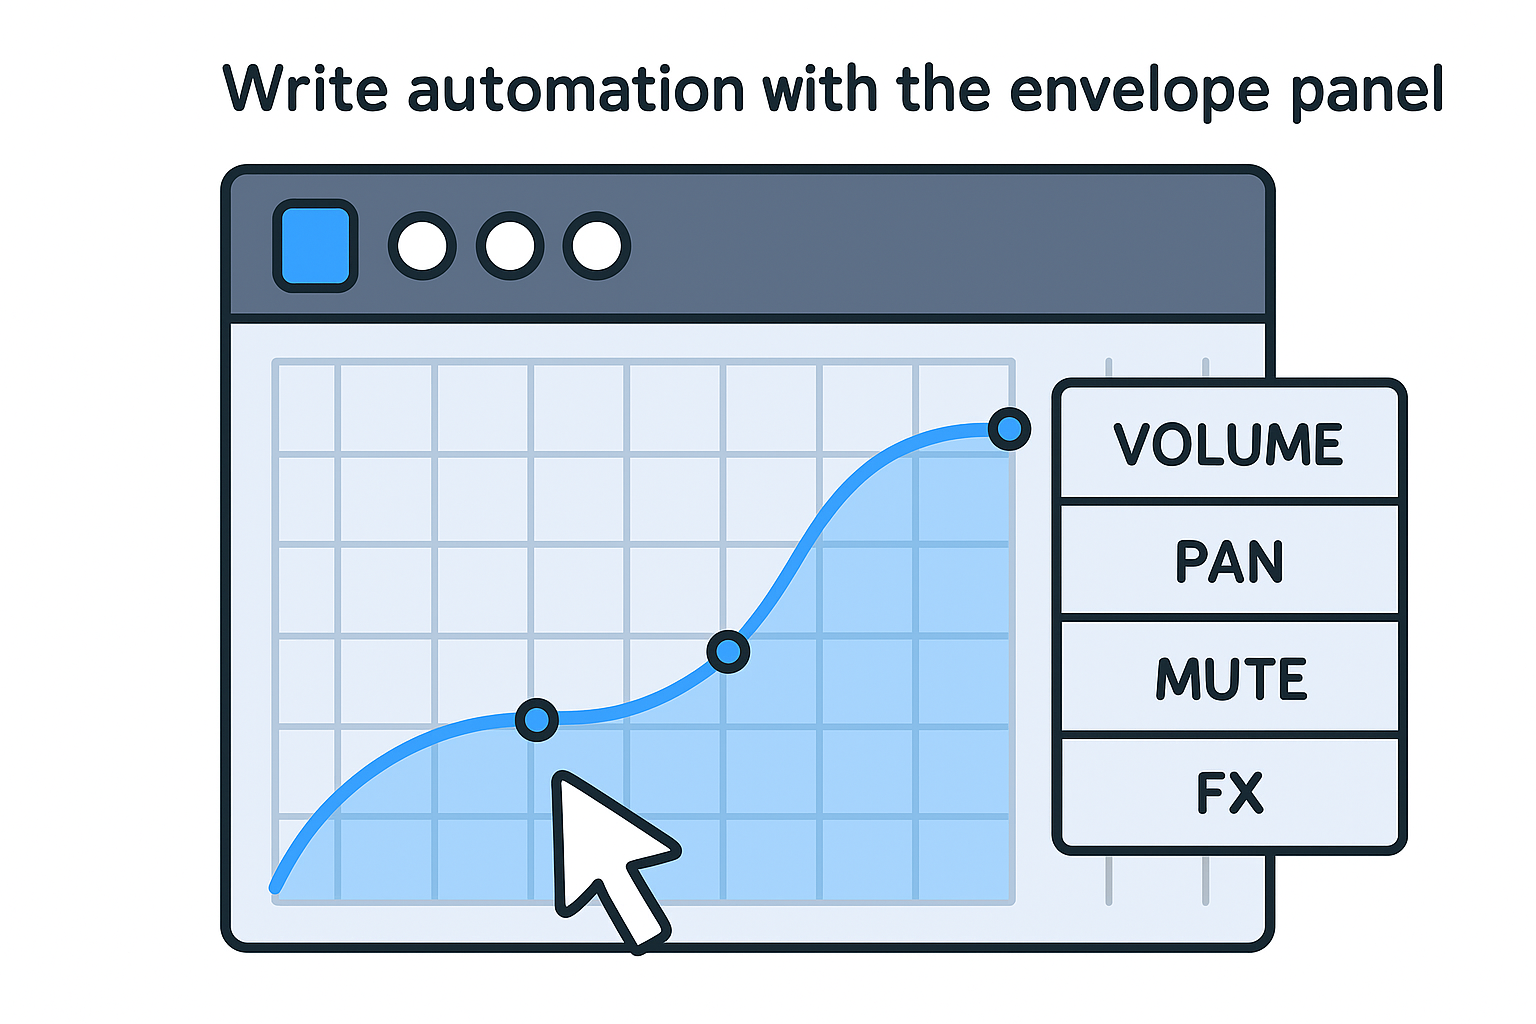
Write automation with the envelope panel
To add automation to a track in this reaper user guide workflow, right-click the track in the Track Control Panel and select Show track envelope from the context menu. REAPER lists every automatable parameter for that track, including Volume, Pan, and Mute, plus every knob and slider inside any loaded FX plugin. Select the parameter you want to control, and REAPER draws a flat envelope line across that track's timeline.
Switching your track's automation mode to "Write" while playing back will capture any real-time knob movements you make directly as envelope points, which is faster than drawing each point manually.
With the envelope visible, click anywhere on the line to add a point, then drag it up or down to set the value at that moment. Holding Shift while dragging curves the segment between two points rather than keeping it as a straight line, which produces smoother fades and more natural-sounding transitions. The table below covers the four automation modes you will use most:
|
Mode
|
What It Does
|
|
Read
|
Plays back recorded envelope data
|
|
Write
|
Records parameter movements in real time
|
|
Touch
|
Writes only while you hold a control, then returns to Read
|
|
Latch
|
Writes from the moment you touch a control until playback stops
|
Automate a filter sweep for an EDM transition
A filter sweep before a drop is one of the most practical automation examples in electronic production. Load a low-pass filter plugin on your lead synth track, open its envelope for the cutoff frequency, and draw a curve that starts low around bar 28 and rises sharply to fully open by bar 32. Set a second envelope on the track volume that dips slightly during the same range, then snaps back to full level on the drop. That combination builds tension and releases it in a way that feels deliberate rather than accidental.
Step 8. Render your mix for release and sharing
When your automation is locked in and your mix sounds right on playback, the last step in this reaper user guide is exporting a finished file. REAPER's render dialog gives you precise control over format, bit depth, sample rate, and output path, which matters because the wrong settings can leave your track sounding quiet, distorted, or incompatible with the platform you are sending it to. Go to File > Render to open the dialog and work through the settings below before you click Render to file.
Choose the right render settings
Every decision in the render dialog affects the quality and usability of your final file, so treat each field as a deliberate choice rather than a default you leave untouched. Set your source to Master mix unless you need stems, point the output directory to a clearly labeled folder like "renders" inside your project, and name the file with the track title and version number so you can identify it later without opening it.
Rendering at 24-bit depth preserves more dynamic range..
7